
Pathway2CM Installation Guide
DISCLAIMER
Any advice FYB provide in relation to setting up any FYB App, FYB Add-in, FYB Connector and or advice in relation to opening access to your on-premise or in the cloud systems will be general advice only. This means that the advice is of a general nature and will not take into account your network setup, network infrastructure or any security requirements that you may have or in fact need. It is highly advised that you seek advice from internal or external providers to ensure that they are comfortable with what is required prior to going ahead with any deployment, setup or configuration for external access.
LICENSE DETAILS
Please contact FYB for a valid license if you are yet to obtain one for your Connector.
INSTALLATION COMPONENTS
The following installation components are required to ensure full functionality of FYB Pathway2CM:
- Pathway Smart Client API required for Content Manager add-ins to work with Pathway on a client machine (client-side deployment)
- FYB Pathway2CM GENCON Driver allows documents to be transferred from Pathway to Content Manager (server-side installation)
The following installation components are optional but are recommended to allow additional functionality with FYB Pathway2CM:
- FYB NAR Access allows links to be manually created between Pathway names and Content Manager locations ( server-side installation)
- FYB Pathway Customer Service Request allows users to select a document record in Content Manager and create a Pathway customer service request using the record meta-data (server-side installation)
- FYB Pathway Launcher allows users to select a Location or Record in Content Manager and Launch Pathway to display the related Pathway object (server-side installation)
- FYB Get Pathway Metadata allows users to select a business object in Pathway and transfer its metadata to a record in Content Manager (server-side installation)
Please note that if you would like to display records from Content Manager via ePathway you will need a subscription to the FYB CM2WebShare. For more information on this, please contact info@fyb.com.au.
INSTALLING PATHWAY SMART CLIENT API
INSTALLATION
In order for Content Manager Add-ins to work with Pathway on a client machine, the Pathway Smart Client API needs to be configured on that machine. These steps also need to be completed before Pathway will recognise the Pathway2cm connector correctly on the server also. The Smart Client API will need to be installed on both the app server that the driver is installed on and any client machines. To install the Pathway Smart Client API on a machine, follow these steps
- Open the Pathway Smart Client
- Navigate to Help -> Diagnostics and Support
- Click Integration Setup
- You will be presented with a UAC confirmation dialog, click Yes (You may need to provide administrator credentials
- Click the Yes button when asked “Do you want to update the Pathway client registry settings?”
INSTALLING FYB PATHWAY2CM GENCON DRIVER
TRUSTED USER ACCOUNT
Add the account that will run the Pathway2CM driver as a Trusted User Account in Enterprise Studio. Please refer to your Enterprise Studio help file on adding trusted accounts.
If using a system account (local system, network service etc) you will be required to enter the details as DOMAIN\ServerName$
If using a dedicated windows service account, you will be required to enter the details as DOMAIN\username
INSTALLATION
-
Create a folder for FYB Addins For example: ‘X:\FYB Addins\
-
Right click on the FYB Addins folder > Properties and click on the Sharing tab
-
If the Network Path is set to ‘Not Shared’
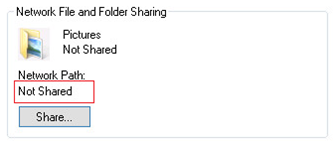
-
Click on the Advanced Sharing button
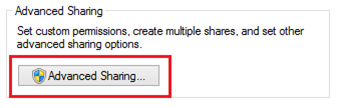
-
In the Advanced Sharing window, tick Share this folder and remove the space between FYB and Addins
-
Add a $ value which will keep the folder hidden
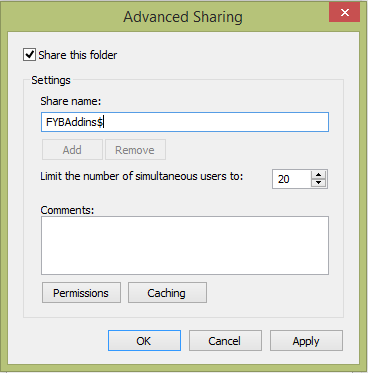
-
Click on the Permissions button
-
Give ‘Everyone’ the ‘Read’ and ‘Change’ permissions

-
A Network Path will now be available
-
Extract the fybpathway2cm-xxx.zip file into the FYB Addins folder. This will create a Pathway2CM folder that contains all installation files The Pathway2CM\GENCON Driver\ folder contains the following files: • Pathway.Connector.FYB.Pathway2CM.dll • Pathway.Connector.FYB.Pathway2CM.dll.config
-
Copy these files into Pathway’s installation msc directory (e.g. X:\Infor\Pathway{Stage}\msc)
LICENSE
-
Create a folder within the shared path to house the license file (.lic)
-
Place the license file in this folder
NoteYou will be asked to enter this location during the installation
SETTINGS
Within the msc directory, open Pathway.Connector.FYB.Pathway2CM.dll.config and update the settings to suit your environment.
The LogPath must not include a '\' at the end.
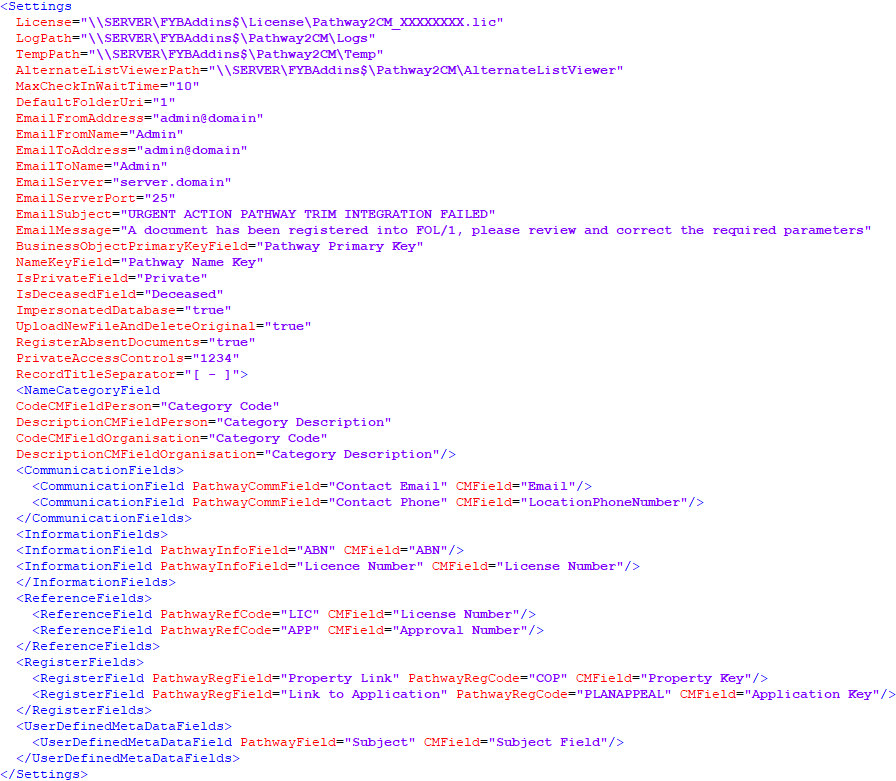
| SETTING | VALUE |
|---|---|
| License | The shared path of the Pathway2CM license |
| LogPath | The shared path of the directory to store log files in NOTE: The path must not include a '\' at the end |
| TempPath | The shared path of the directory to store temporary files in. NOTE: Pathway will also use other temporary folders as needed. |
| AlternateListViewerPath | The shared path of the Pathway2CM\AlternateListViewer folder. |
| MaxCheckInWaitTime | When a document is opened for editing through Pathway2CM, Pathway2CM will wait until the document has checked in to Content Manager. MaxCheckInWaitTime sets the maximum length of time in seconds that Pathway2CM will wait. |
| DefaultFolderUri | The URI of the default container. If any documents are sent to this container, then a notification email will be sent using the email settings defined below. |
| EmailFromAddress | The address that will appear as the sender of the notification emails |
| EmailFromName | The name that will appear as the sender of notification emails |
| EmailToAddress | The address that notification emails will be sent to |
| EmailToName | The name that the notification emails will be addressed to |
| EmailServer | The email server to use to send notification emails |
| EmailServerPort | The email server port to use to send notification emails |
| EmailSubject | The subject line of notification emails |
| EmailMessage | The text of notification emails |
| BusinessObjectPrimaryKeyField | The name of the Content Manager field that will store the Business Object Primary Key |
| NameKeyField | The name of the Content Manager field that will store the Name Key |
| IsPrivateField | The name of the Content Manager field that will store the Private status of the location |
| IsDeceasedField | The name of the Content Manager field that will store the Deceased status of the location |
| ImpersonatedDatabase | Set this to true to make the Pathway2CM GENCON driver connect to Content Manager as the windows account of the current Pathway user. If this is set to false, then the Pathway2CM GENCON driver will connect to Content Manager as the account that is running the Pathway service, OR as the account that is configured in the Pathway GENCON settings, if there is one. |
| UploadNewFileAndDeleteOriginal | This setting relates to attaching paperclip documents. If the attachment type has the option “Upload New Files” selected, then Pathway creates a copy of paperclip attachments in the selected default path. If the original is also in the default path, then the title of the duplicate document will have “_1” appended to it. Normally, the Pathway2CM GENCON driver will upload and then delete the copy file, and the original file will be left in its original location. If UploadNewFileAndDeleteOriginal is set to true, then Pathway2CM will attempt to identify if an uploaded paperclip document is a duplicate of a file in the same folder, and if it is, Pathway2CM will delete the original file as well as the duplicate. If the original file is in a different folder than the copy, then the original will not be deleted. |
| RegisterAbsentDocuments | This setting provides a workaround for a Pathway issue where Pathway behaves as though a document is registered in Content Manager, even if it isn't. When this is set to true, then if Pathway attempts to retrieve a document from Content Manager, and the document is not in Content Manager, but it is on the network, then the document will be registered into Content Manager. This should generally be set to true. |
| PrivateAccessControls | A comma delimited list of location uris. When a name in Pathway is set to Private, the related Content Manager location will have it's access controls restricted to the locations in this list. |
| RecordTitleSeparator | The characters that are used to separate title fields. This should be the same as the Record Title Separator in the GENCON settings (see EDMS MODULE MAINTENANCE). If this field is left blank, then it's value will default to "[ - ]" |
| NameCategoryField | The Content Manager fields that will store data from the Person Category and Company Category name fields in Pathway. CodeCMFieldPerson - The Content Manager field that will store the Category Code from the Person Category field. DescriptionCMFieldPerson - The Content Manager field that will store the Category Description from the Person Category field. CodeCMFieldOrganisation - The Content Manager field that will store the Category Code from the Company Category field. DescriptionCMFieldOrganisation - The Content Manager field that will store the Category Description from the Company Category field. |
| CommunicationFields | The Content Manager location fields that will store data from the Communication Details name fields in Pathway. PathwayCommField - The Pathway Communication Type. CMField - The Content Manager field that will store this Communication Type. To map to the location’s Email field enter Email. Multiple Pathway email fields can be mapped to Email. (see Content Manager Fields). |
| InformationFields | The Content Manager fields that will store data from the Information Details name fields in Pathway. PathwayInfoField - The Pathway Communication Type. CMField - The Content Manager field that will store this Information Type. |
| ReferenceFields | The Content Manager fields that will store data from the Reference fields in Pathway. PathwayRefCode - The Pathway Reference Type Code CMField - The Content Manager field that will store this Reference Type. |
| RegisterFields | The Content Manager fields that will store data from the Register fields in Pathway. PathwayRegField - The Pathway Register Field Name PathwayRegCode – The Pathway Register Code CMField - The Content Manager field that will store this Register field value. |
| UserDefinedMetaDataFields | The Content Manager fields that will store data from the User Defined Meta-Data fields in Pathway. PathwayField - The Pathway User Defined Meta-Data Field Name CMField - The Content Manager field that will store this field value. A single User Defined Meta-Data field can be mapped to multiple Content Manager fields, by listing them with a comma to separate. |
CONFIGURATION
EDMS PRODUCT PARAMETER MAINTENANCE
-
Open the Pathway Smart Client and on the main menu, select a group that has access to System Administration settings
-
Navigate to System Administration -> Integration -> Document Management Parameters -> Document Management Product Parameters
-
Click the Search button
-
Select the Document Management Product with the Document Management Code GENCON
-
Click the Modify button
-
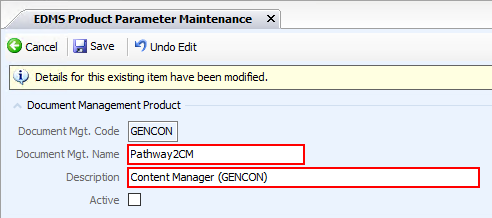
Enter a Document Management Name and Description for the connector
-
Leave the Active checkbox unchecked for now.
-
Click the Save button
EDMS MODULE MAINTENANCE
-
In EDMS Product Parameter Maintenance, under Options, select Additional Parameters
-
On the EDMS Module Maintenance screen, enable Use Caching under Document Management Product

-
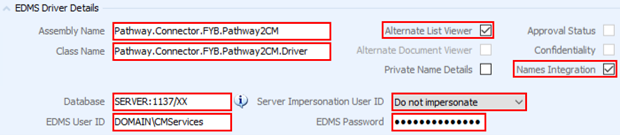
Under EDMS Driver Details, set the below.
 Note
You will need to set the Assembly Name and Class Name and save the settings before the Alternate List Viewer and Names Integration options become available
SETTING VALUE Assembly Name Pathway.Connector.FYB.Pathway2CM Class Name Pathway.Connector.FYB.Pathway2CM.Driver Alternate List Viewer If this checkbox is checked, then when Document Management is selected, documents will be listed within a new Content Manager search window. Names Integration This setting is optional. Selecting this option enables the creation of Name Role links between Pathway and Content Manager. Database The details of the Content Manager dataset you want to connect to. The format should be {Server}:{Port}/{Dataset ID}. E.g. if your workgroup server is CMAPP01 and your dataset id is CP then input the following: CMAPP01:1137/CP Server Impersonation User ID Do not impersonate EDMS User ID The account that Pathway2CM will use to connect to Content Manager. This is optional. If nothing is entered in this field, then Pathway2CM will connect to CM as the account that is running the Pathway service. Whichever account is used must be added as a trusted account in Content Manager, see Trusted User Account EDMS Password The password of the account entered in EDMS User ID. -
Under Defaults, set the following:

SETTING VALUE Use Folders Check this box to have documents transferred to CM be contained in folders. Folder Name The record number of the default folder. Documents transferred to Content Manager will be placed in this folder, unless otherwise configured in the module metadata settings. Record Title Separator The character(s) that will separate the different parts of the document title.
USER DEFINED META-DATA
All user defined meta-data fields and values must be defined in the GENCON options before they can be used in the module settings. These settings only take effect for the modules that they are applied to.
- On the EDMS Module Maintenance screen, under Options, select User Defined Meta-Data
- Add the following Item Types, each with a Cardinality of 1, and each applying to User Defined Only: To add a new Item Type, follow these steps: i. Click the new item type button

ii. Enter the Item Type and under Applies To select User Defined Only

To add Items to the new Item Type, follow these steps: i. Click the Items button

ii. For each item, click the new item button
iii. Enter the value of the Item

iv. Once you have added all of the items, click the Save button

Once you have added all the Item Types, click the Save button
| ITEM TYPE | NECESSITY | ITEMS |
|---|---|---|
| Author Uri | Mandatory | The URIs of Locations to be used as Authors on documents transferred to Content Manager |
| Use Document Author | Optional | Can be set to True or False. This setting will default to True if left blank. If set to True, then Pathway2CM will set the record author in Content Manager based on the author of the document being transferred. If set to False, then the Author will always be set based on the Author Uri setting. This setting only applies to Word documents(.docx). |
| Container Record Type | Optional | The names of the container record type that will be created by Pathway2CM. This field is required for modules where folder creation is required. |
| Document Record Type | Optional | The names of the document record types that will be created by Pathway2CM. If this field is not included, then both Paperclip Document Record Type and Merge Document Record Type must be included. |
| Finalise Paperclips | Optional | Can be set to True or False. This setting will default to False if left blank. If set to True, all paperclips transferred to Content Manager will be finalised. |
| Set Assignee To Home | Optional | Can be set to True or False. This setting will default to False if left blank. If set to True, the Assignee location for the record is set the home location. |
| Merge Document Record Type | Optional | The names of the document record types that will be created by Pathway2CM for merge documents. This field can be used in conjunction with the Document Record Type field or the Paperclip Document Record Type field. This field overrides Document Record Type if it is present. |
| Paperclip Document Record Type | Optional | The names of the document record types that will be created by Pathway2CM for paperclips. This field can be used in conjunction with the Document Record Type field or the Merge Document Record Type field. This field overrides Document Record Type if it is present. |
| Merge Document Title | Optional | Items in this field can be used to specify a titling scheme for merge documents. This field can be used in conjunction with the Merge Document Title field. Fieldnames should be surrounded by curly brackets: e.g. “{Document Summary} – {Document Primary Key}“. The field names supplied can be either the GENCON field name, or the Field Name Override. NOTE: For each field included in the title, the Use Meta-Data option must be selected in the document meta-data list for the module. |
| Paperclip Title | Optional | Items in this field can be used to specify a titling scheme for paperclip documents. This field can be used in conjunction with the Merge Document Title field. Fieldnames should be surrounded by curly brackets: e.g. “{Document Summary} – {Document Primary Key}“. The field names supplied can be either the GENCON field name, or the Field Name Override. NOTE: For each field included in the title, the Use Meta-Data option must be selected in the document meta-data list for the module. |
| Add or Replace Security | Optional | Can be set to Add or Replace. This setting will default to Add if left blank. If set to Add, then security settings set using the fields below will be added to default record security settings. If set to Replace, then security settings set using the fields below will replace default record security settings. |
| Bypass Record Type Access Controls | Optional | Can be set to True or False. This setting will default to False if left blank. If set to True, then when a document is transferred to CM, the record option Bypass Record Type access control references will be checked. This means that the default access controls for that record type will not be applied to the record. |
| Caveat Uri | Optional | Each item is a comma separated list of the URIs of security caveats to be added to records created in Content Manager. |
| Access Controls Uri | Optional | Each item is a comma separated list of the URIs of Locations to be added to all access controls of records created in Content Manager. |
| View Document Uri | Optional | Each item is a comma separated list of the URIs of Locations to be added to the View Document access control of records created in Content Manager. |
| View Metadata Uri | Optional | Each item is a comma separated list of the URIs of Locations to be added to the View Metadata access control of records created in Content Manager. |
| Update Document Uri | Optional | Each item is a comma separated list of the URIs of Locations to be added to the Update Document access control of records created in Content Manager. |
| Update Metadata Uri | Optional | Each item is a comma separated list of the URIs of Locations to be added to the Update Metadata access control of records created in Content Manager. |
| Modify Access Uri | Optional | Each item is a comma separated list of the URIs of Locations to be added to the Modify Access access control of records created in Content Manager. |
| Destroy Record Uri | Optional | Each item is a comma separated list of the URIs of Locations to be added to the Destroy Record access control of records created in Content Manager. |
| Contribute Contents Uri | Optional | Each item is a comma separated list of the URIs of Locations to be added to the Contribute Contents access control of records created in Content Manager. |
| Notes Update Type | Optional | Controls how notes should be added to records in Content Manager. Can be set to one of the following options: Overwrite - Replace existing notes AppendOnly - Append to existing notes AppendWithNewLine - Append to existing notes with new line AppendWithUserStamp - Append to existing notes and include user stamp PrependOnly - Prepend existing notes. PrependWithNewLine - Prepend existing notes with new line PrependWithUserStamp - Prepend existing notes and include user stamp |
| Filename | Optional | The name of the Content Manager field to store a document's filename. |
| Filename Title | Optional | Can be set to Append, Prepend, or left blank. When set to Append, the document file name will be appended to the record's title in Content Manager. When set to Prepend, the document file name will be prepended to the record's title in Content Manager. If left blank, the filename will not be included in the record's title in Content Manager. |
EDMS MODULE PARAMETER MAINTENANCE
For each module that is to be used:
-
Select the module on the EDMS Module Maintenance screen
-
Under Options, select User Defined Meta-Data
-
For each folder meta-data field and document meta-data field that is to be included in the meta-data in CM:
-
Enter the Name of the Content Manager field or property that the field should be mapped to in the Field Name Override column (see Content Manager Fields). To map a Pathway field to multiple Content Manager fields, enter the Content Manager fields separated by commas.
NoteMulti cardinality Pathway fields(e.g. registers) cannot be mapped to multiple Content Manager fields. There is also a 50 character limit to the Field Name Override column in pathway
-
Enable the Use Meta-Data checkbox
-
Optionally, enable the Use In Titling checkbox if the field should be included in the record title
 Note
Checking the Use Meta-Data checkbox for the Document Meta-Data field named “{module} Formatted Names“ will set Pathway2CM to create and attach contacts to the record in Content Manager for the related names in Pathway.
NoteThe Use Meta-data checkbox must be checked for the Document Final Print By and Document Final Print Date fields as the driver uses these fields to determine if a document has been finalised.

-
Under User Defined Meta-Data select the appropriate setting for Author URI

-
Under User Defined Meta-Data select the appropriate setting for Use Document Author
NoteThis field is optional.

-
Under User Defined Meta-Data select the appropriate setting for Container Record Type. This is only required if Use Folders is checked and Container Creation Required is checked for this module.

-
Under User Defined Meta-Data select the appropriate setting for Finalise Paperclips

-
Under User Defined Meta-Data set either: Document Record Type to set the record type for both merge documents and paperclips,

OR Merge Document Record Type and Paperclip Document Record Type to set the record types for merge documents and paperclips separately.

- Under User Defined Meta-Data set Merge Document Title and Paperclip Title (Optional) If Paperclip Title is set, then any paperclips created for this module will have their title set according to this setting. Otherwise their title will be set according to the fields that have Use In Titling selected. If Merge Document Title is set, then any merge documents created for this module will have their title set according to this setting. Otherwise their title will be set according to the fields that have Use In Titling selected.

-
Under User Defined Meta-Data set Add or Replace Security (Optional)

-
Under User Defined Meta-Data set Bypass Record Type Access Controls (Optional)

-
Under User Defined Meta-Data set Caveat Uri (Optional)

-
Under User Defined Meta-Data set Access Controls Uri (Optional)

-
Under User Defined Meta-Data set View Document Uri (Optional)

-
Under User Defined Meta-Data set View Metadata Uri (Optional)

-
Under User Defined Meta-Data set Update Document Uri (Optional)

-
Under User Defined Meta-Data set Update Metadata Uri (Optional)

-
Under User Defined Meta-Data set Modify Access Uri (Optional)

-
Under User Defined Meta-Data set Destroy Record Uri (Optional)

-
Under User Defined Meta-Data set Contribute Contents Uri (Optional)
 Note
Making changes to record security requires appropriate permissions in Content Manager. In general, this processing takes place on the Pathway server and these changes will be carried out by the service account that is running the Pathway service. However in some circumstances (for example in certain batch processing configurations), this processing takes place on the user’s machine. If this occurs, and the user does not have permission to change record security, then the record security settings will fail.
-
Under User Defined Meta-Data set Notes Update Type This field is optional. If left blank, Notes Update Type will default to PrependWithUserStamp

-
Under User Defined Meta-Data set Filename (Optional)

-
Under User Defined Meta-Data set Filename Title (Optional)

ENABLE AUTOMATIC NAME ROLE CREATION AND ALTERNATE NAME LIST VIEWER
NOTE: Names with Name Roles cannot be deleted without first deleting the Name Role.
-
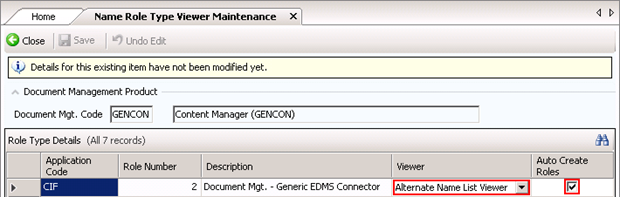
On the EDMS Module Maintenance screen, select the option Name Role Type Viewers
-
For the Role Type CIF-2 Document Mgt. – Generic EDMS Connector, select Alternate Name List Viewer in the Viewer column
-
For the Role Type CIF-2 Document Mgt. – Generic EDMS Connector, check Auto Create Roles
-
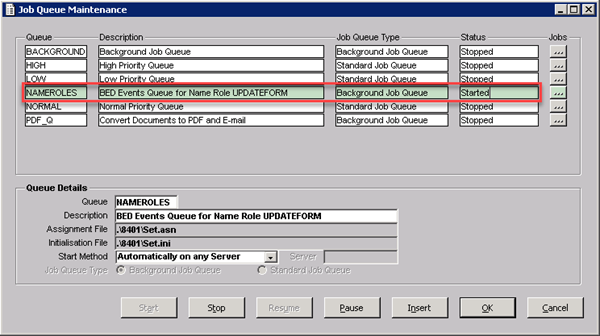
Navigate to Batch Processing -> Maintain Job Queues Administrator Level (You may need to log in as SCASYS)
-
Start the NAMEROLES job queue
-
Click OK
NoteIf name roles aren’t being automatically created for new names, the NAMEROLES job queue may need to be restarted.
FINALIZE THE CONFIGURATION
-
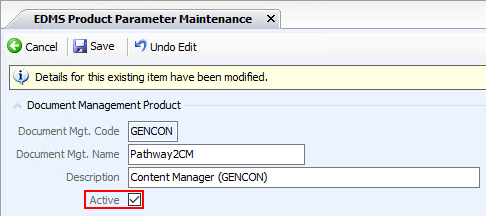
Return to the EDMS Product Parameter Maintenance screen for GENCON
-
Enable the Active checkbox
-
Click the Save button
-
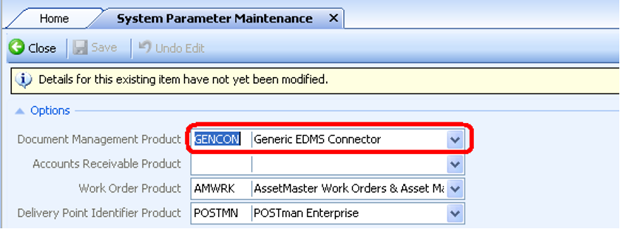
Navigate to System Administration -> Integration -> System Parameter Maintenance
-
Set the Document Management Product to GENCON, and click the Save button
-
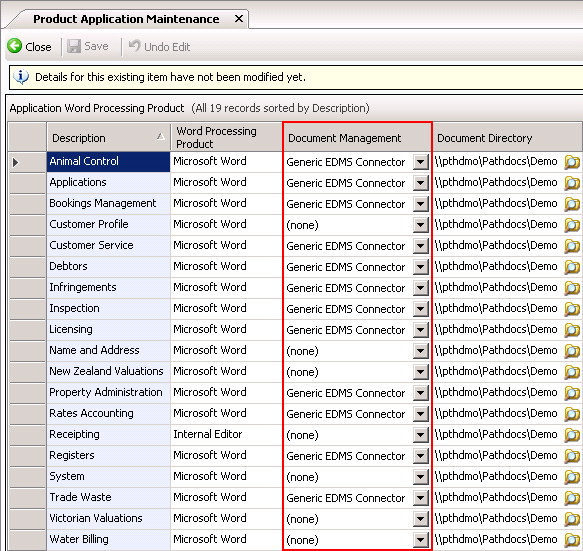
Navigate to Word Processing -> Word Processing Parameters -> Product Application Maintenance
-
For each module in use, set the Document Management field to Generic EDMS Connector
-
Click the Save button
-
If you previously had the TRIMCO connector active, then you can now deactivate it
NoteWhen installing the GENCON driver, or altering the installation you may also need to do the following steps below before and after making changes:
-
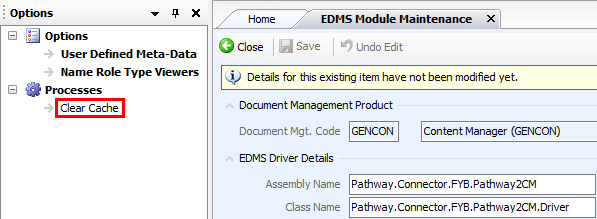
In the Options pane of the of EDMS Module Maintenance window, double click on Clear Cache
-
Navigate to the Diagnostics and Support window by selecting Help -> Diagnostics and Support

-
Click the Refresh button
-
Close and re-open the Pathway smart client
INSTALLING FYB NAR ACCESS
INSTALLATION
The NAR Access files are installed during the INSTALLATION FYB PATHWAY2CM GENCON DRIVER section.
CONFIGURATION
CM 9.4 AND BELOW
-
Open Content Manager and click on Tools > Administration > External Links
-
Click on New Executable option
-
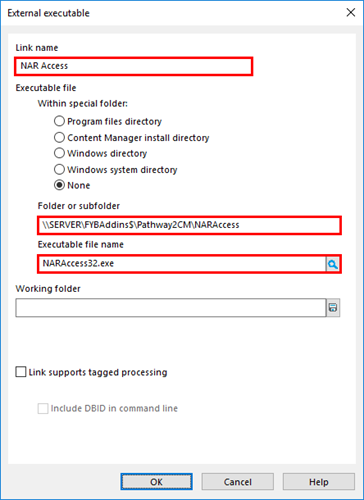
Enter the Link Name as NAR Access
-
Under ‘Folder or Subfolder’, enter the Network Location of the FYB Addins\Pathway2CM\NARAccess folder obtained in step 9 of INSTALLING FYB PATHWAY2CM GENCON DRIVER
NOTEPlease use the fully qualified domain name (FQDN) when adding the External Links to stop security prompts For Example: If the share has been set up as \server\FYB Addins$\Pathway2CM\NARAccess
The FQDN is \server.domain.local\FYBAddIns$\Pathway2CM\NARAccess
You can obtain the FQDN from the Server you are installing at Computer > Properties -
Under Executable File Name browse to the NARAccess folder and select
 (for 32-bit) OR
 (for 64-bit)
-
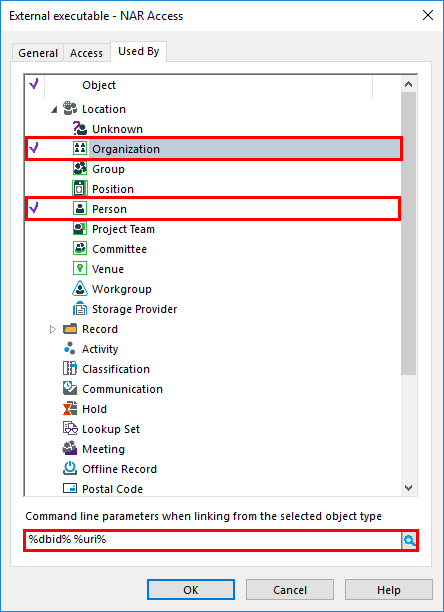
Click the OK button and navigate back into the Properties of the NAR Access Add-In and select the Used By tab
-
Tag the Organization and Person location types and enter the parameter %dbid% %uri% for each one:
-
Click the OK button twice
NOTETo setup NAR Access to be available for both 32-bit and 64-bit versions of Content Manager, simply repeat the steps above using the 32-bit executable and 64-bit executable and give the external links different names.
CM 10 AND ABOVE
-
Open Content Manager and click on Tools > Administration > External Links
-
Right Click, and select New External Link
-
From the external link type list, select External executable, and click the OK button
-
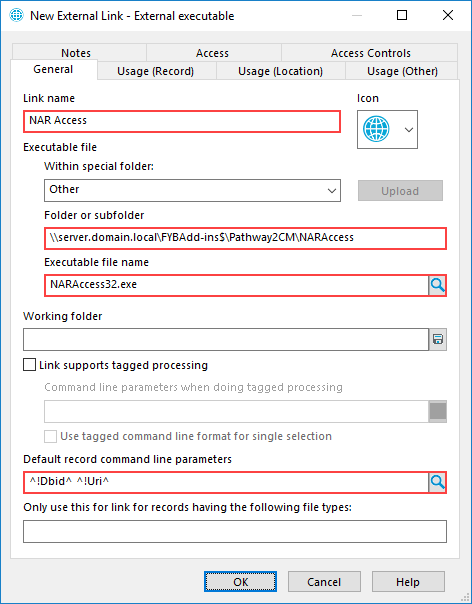
Enter the Link Name as NAR Access
-
Under ‘Folder or Subfolder’, enter the Network Location of the FYB Addins\Pathway2CM\NARAccess folder obtained in step 9 of INSTALLING FYB PATHWAY2CM GENCON DRIVER
NOTEPlease use the fully qualified domain name (FQDN) when adding the External Links to stop security prompts For Example: If the share has been set up as \server\FYB Addins$\Pathway2CM\NARAccess
The FQDN is \server.domain.local\FYBAddIns$\Pathway2CM\NARAccess
You can obtain the FQDN from the Server you are installing at Computer > Properties -
Under Executable File Name browse to the NARAccess folder and select
(for 32-bit) OR (for 64-bit) -
Under Default record command line parameters enter ^!Dbid^ ^!Uri^
-
Select the Usage (Location) tab
-
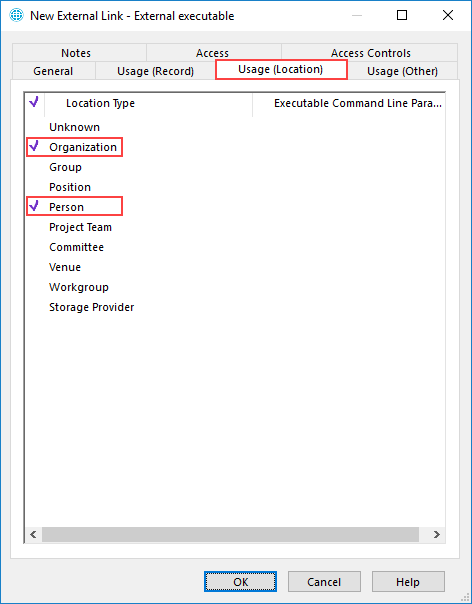
Tag the Organization and Person location types
-
Click the OK button
NOTETo setup NAR Access to be available for both 32-bit and 64-bit versions of Content Manager, simply repeat the steps above using the 32-bit executable and 64-bit executable and give the external links different names.
SETTINGS
Within the \Pathway2CM\NARAccess\ folder, open NARAccess.config and update the settings to suit your environment.

| SETTING | VALUE |
|---|---|
| License | The shared path of the Pathway2CM license |
| LogPath | The shared path of the directory to store log files in |
| NameKeyField | The name of the Content Manager field that will store the Name Key (see Content Manager Fields). |
| PathwayDatabaseName | The name of the Pathway database to connect to |
INSTALLING FYB PATHWAY CUSTOMER SERVICE REQUEST
INSTALLATION
The Customer Service Request files are installed during the INSTALLATION FYB PATHWAY2CM GENCON DRIVER section.
CONFIGURATION
CM 9.4 AND BELOW
-
Open Content Manager and click on Tools > Administration > External Links
-
Click on New Executable option
-
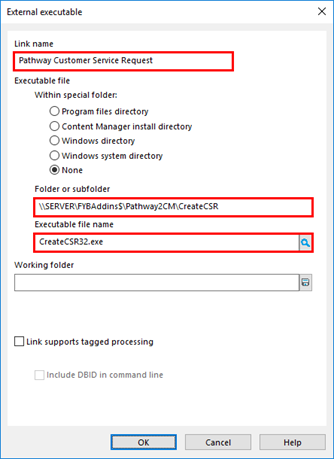
Enter the Link Name as Pathway Customer Service Request
-
Under ‘Folder or Subfolder’, enter the Network Location of the FYB Addins\Pathway2CM\CreateCSR folder obtained in step 9 of INSTALLING FYB PATHWAY2CM GENCON DRIVER
NOTEPlease use the fully qualified domain name (FQDN) when adding the External Links to stop security prompts For Example: If the share has been set up as \server\FYB Addins$\Pathway2CM\CreateCSR
The FQDN is \server.domain.local\FYBAddIns$\Pathway2CM\CreateCSR
You can obtain the FQDN from the Server you are installing at Computer > Properties -
Under Executable File Name browse to the CreateCSR folder and select
 (for 32-bit) OR
 (for 64-bit)
-
Click the OK button and navigate back into the Properties of the Pathway Customer Service Request Add-In and select the Used By tab
-
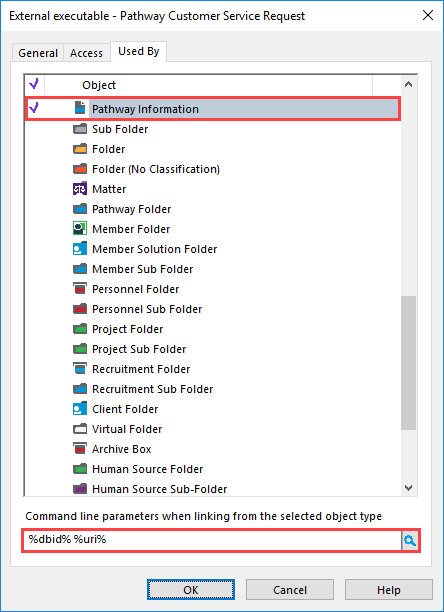
Tag the appropriate record types and enter the Parameter %dbid% %uri% for each one:
-
Click the OK button twice
NOTETo setup Pathway Customer Service Request to be available for both 32-bit and 64-bit versions of Content Manager, simply repeat the steps above using the 32-bit executable and 64-bit executable and give the external links different names.
CM 10 AND ABOVE
-
Open Content Manager and click on Tools > Administration > External Links
-
Right Click, and select New External Link
-
From the external link type list, select External executable, click the OK button
-
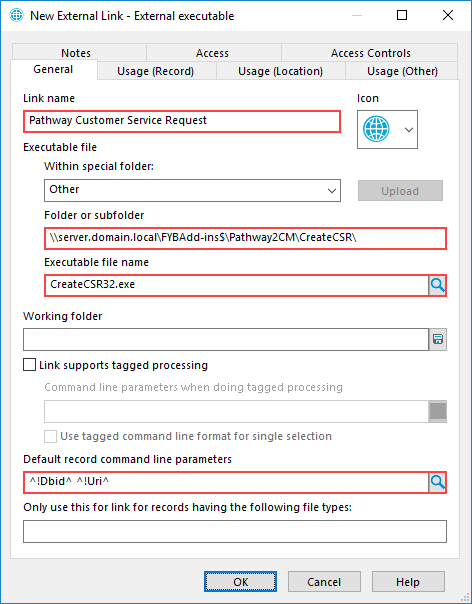
Enter the Link Name as Pathway Customer Service Request
-
Under ‘Folder or Subfolder’, enter the Network Location of the FYB Addins\Pathway2CM\CreateCSR folder obtained in step 9 of INSTALLING FYB PATHWAY2CM GENCON DRIVER
NOTEPlease use the fully qualified domain name (FQDN) when adding the External Links to stop security prompts For Example: If the share has been set up as \server\FYB Addins$\Pathway2CM\CreateCSR
The FQDN is \server.domain.local\FYBAddIns$\Pathway2CM\CreateCSR
You can obtain the FQDN from the Server you are installing at Computer > Properties -
Under Executable File Name browse to the CreateCSR folder and select
(for 32-bit) OR (for 64-bit) -
Under Default record command line parameters enter ^!Dbid^ ^!Uri^
-
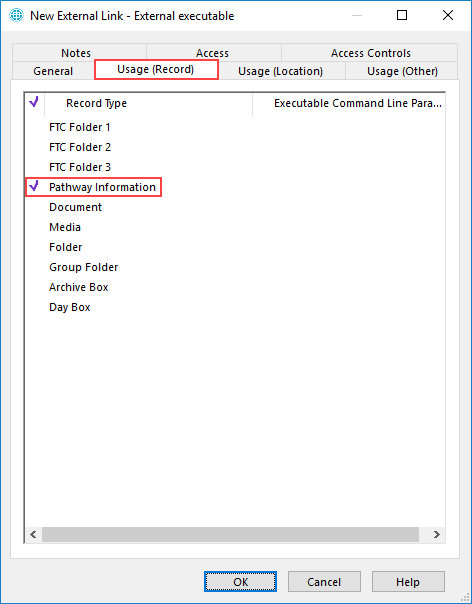
Select the Usage (Record) tab
-
Tag the appropriate record types
-
Click the OK button
SETTINGS
Within the \Pathway2CM\CreateCSR\ folder, open CreateCSR.config and update the settings to suit your environment.
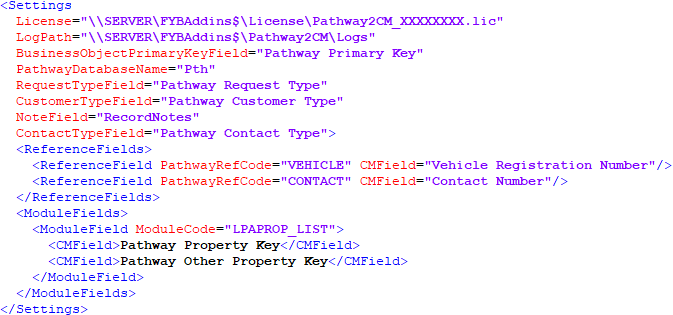
| SETTING | VALUE |
|---|---|
| License | The shared path of the Pathway2CM license |
| LogPath | The shared path of the directory to store log files in |
| BusinessObjectPrimaryKeyField | The name of the Content Manager field that will store the Business Object Primary Key of the Customer Service Request after it is created (see Content Manager Fields). |
| PathwayDatabaseName | The name of the Pathway database to connect to. |
| RequestTypeField | The name of the Content Manager field that stores the value of the Request Type code to send to Pathway. |
| CustomerTypeField | The name of the Content Manager field that stores the value of the Customer Type code to send to Pathway. |
| NoteField | The name of the Content Manager field that stores the value of the Notes to send to Pathway. (see Content Manager Fields). |
| ContactTypeField | The name of the Content Manager field that stores the value of the Contact Type code to send to Pathway. |
| ReferenceFields | The Content Manager fields that store values to send to the References fields in Pathway. PathwayRefCode - The Pathway Reference Type Code. CMField - The Content Manager field that stores this Reference Type. |
| ModuleFields | The Content Manager fields that store values to send to the Modules fields in Pathway. ModuleCode - The Module Code This will only work where the role type links to ACRREQU and is not user defined. The following are currently available: ABKRQHD_LIST: Booking CNAIDTY_LIST: Name CRGREGV_LIST: Registers LANANML_LIST: Animal LAPAPPL_LIST: Applications LRAASSM_LIST: Debtors LIFOTIN_LIST: Infringement LININSP_LIST: Inspections LAPAPPL_LIST: Licensing LPAPROP_LIST: Property LPASTSB_LIST: Street\Suburb LPAWARD_LIST: Ward LRAASSM_LIST: Assessment LVZVALU_LIST: New Zealand Valuation LVZOBJN_LIST: New Zealand Valuation Objection CMField – The Content Manager field that stores this module value |
INSTALLING FYB PATHWAY LAUNCHER
INSTALLATION
The FYB Pathway Launcher files are installed during the INSTALLATION FYB PATHWAY2CM GENCON DRIVER section.
CONFIGURATION
CM 9.4 AND BELOW
-
Open Content Manager and click on Tools > Administration > External Links
-
Click on New Executable option
-
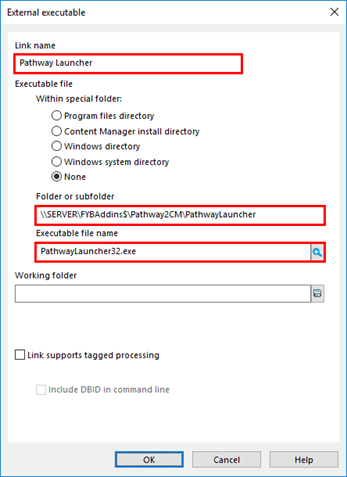
Enter the Link Name as Pathway Launcher
-
Under ‘Folder or Subfolder’, enter the Network Location of the FYB Addins\Pathway2CM\PathwayLauncher folder obtained in step 9 of INSTALLING FYB PATHWAY2CM GENCON DRIVER
NOTEPlease use the fully qualified domain name (FQDN) when adding the External Links to stop security prompts For Example: If the share has been set up as \server\FYB Addins$\Pathway2CM\PathwayLauncher
The FQDN is \server.domain.local\FYBAddIns$\Pathway2CM\PathwayLauncher
You can obtain the FQDN from the Server you are installing at Computer > Properties -
Under Executable File Name browse to the PathwayLauncher folder and select the following:
 (for 32-bit) OR
 (for 64-bit)
-
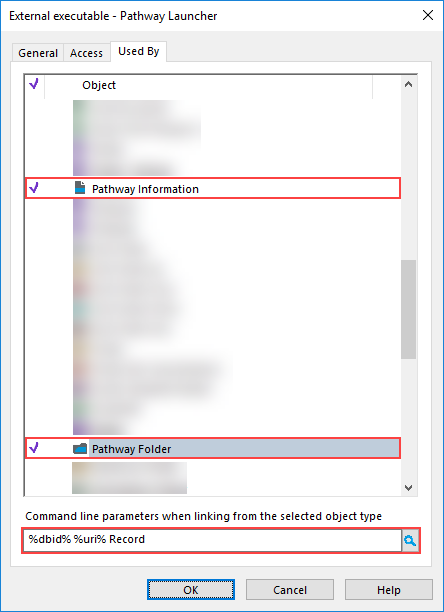
Click the OK button and navigate back into the Properties of the Pathway Launcher Add-In and select the Used By tab
-
To set up Pathway Launcher to work with locations, tag the Organization and Person location types, and enter the parameter "%dbid% %uri% Location" for each one:

-
To set up Pathway Launcher to work with records, tag the appropriate record types, and enter the parameter "%dbid% %uri% Record" for each one:
-
Click the OK button twice
NOTETo setup Pathway Launcher to be available for both 32-bit and 64-bit versions of Content Manager, simply repeat the steps above using the 32-bit executable and 64-bit executable and give the external links different names.
CM 10 AND ABOVE
-
Open Content Manager and click on Tools > Administration > External Links
-
Right Click, and select New External Link
-
From the external link type list, select External executable, click OK
-
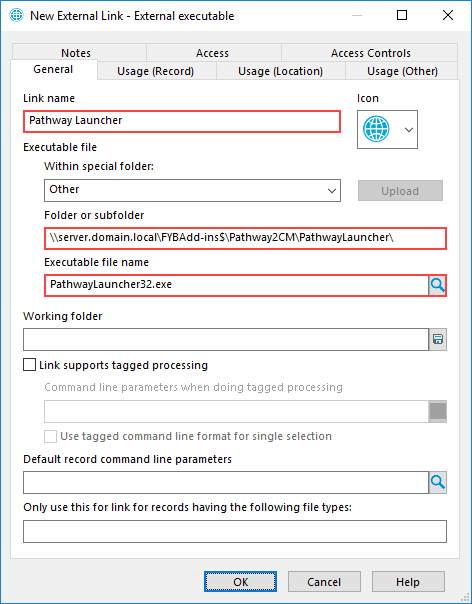
Enter the Link Name as Pathway Launcher
-
Under ‘Folder or Subfolder’, enter the Network Location of the FYB Addins\Pathway2CM\PathwayLauncher folder obtained in step 9 of INSTALLING FYB PATHWAY2CM GENCON DRIVER
NOTEPlease use the fully qualified domain name (FQDN) when adding the External Links to stop security prompts For Example: If the share has been set up as \server\FYB Addins$\Pathway2CM\PathwayLauncher
The FQDN is \server.domain.local\FYBAddIns$\Pathway2CM\PathwayLauncher
You can obtain the FQDN from the Server you are installing at Computer > Properties -
Under Executable File Name browse to the PathwayLauncher folder and select
(for 32-bit) OR (for 64-bit)
-
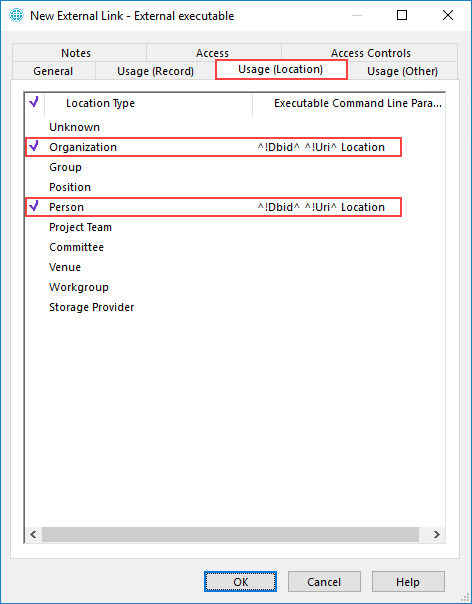
To set up Pathway Launcher to work with locations select the Usage (Location) tab. Tag the Organization and Person location types, and enter the parameter ^!Dbid^ ^!Uri^ Location for each one:
-
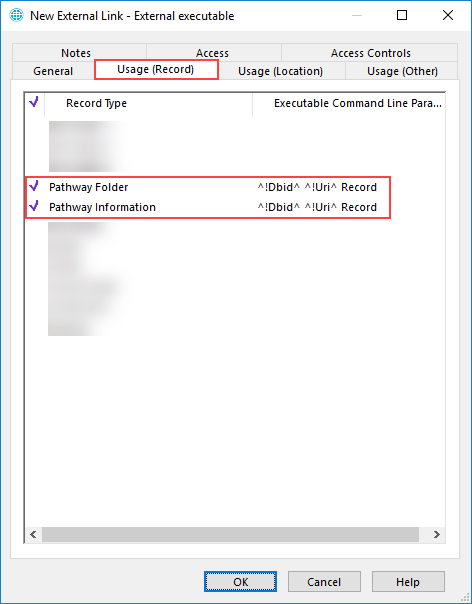
To set up Pathway Launcher to work with records, select the Usage (Record) tab. Tag the appropriate record types, and enter the Executable parameter ^!Dbid^ ^!Uri^ Record for each one:
-
Click the OK button
NOTETo setup Pathway Launcher to be available for both 32-bit and 64-bit versions of Content Manager, simply repeat the steps above using the 32-bit executable and 64-bit executable and give the external links different names.
SETTINGS
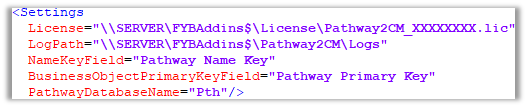
Within the \Pathway2CM\PathwayLauncher\ folder, open Open PathwayLauncher.config and update the settings to suit your environment.
| SETTING | VALUE |
|---|---|
| License | The shared path of the Pathway2CM license. |
| LogPath | The shared path of the directory to store log files in. |
| NameKeyField | The name of the Content Manager field that stores the Name Key (see Content Manager Fields). |
| BusinessObjectPrimaryKeyField | The name of the Content Manager field that stores the Business Object Primary Key (see Content Manager Fields). |
| PathwayDatabaseName | The name of the Pathway database to connect to. |
INSTALLING FYB GET PATHWAY METADATA
INSTALLATION
The FYB Get Pathway Metadata files are installed during the INSTALLATION FYB PATHWAY2CM GENCON DRIVER section.
CONFIGURATION
CM 9.4 AND BELOW
-
Open Content Manager and click on Tools > Administration > External Links
-
Click on New Executable option
-
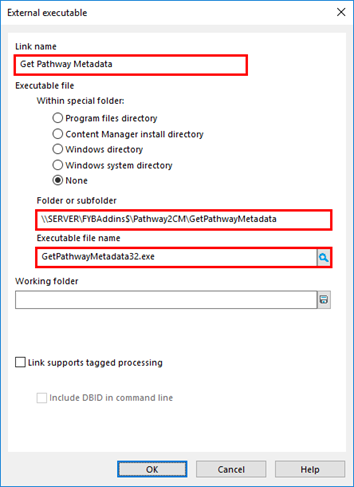
Enter the Link Name as Get Pathway Metadata
-
Under ‘Folder or Subfolder’, enter the Network Location of the FYB Addins\Pathway2CM\GetPathwayMetadata folder obtained in step 9 of INSTALLING FYB PATHWAY2CM GENCON DRIVER
NOTEPlease use the fully qualified domain name (FQDN) when adding the External Links to stop security prompts For Example: If the share has been set up as \server\FYB Addins$\Pathway2CM\GetPathwayMetadata
The FQDN is \server.domain.local\FYBAddIns$\Pathway2CM\GetPathwayMetadata
You can obtain the FQDN from the Server you are installing at Computer > Properties -
Under Executable File Name browse to the GetPathwayMetadata folder and select the following:
 (for 32-bit) OR
 (for 64-bit)
-
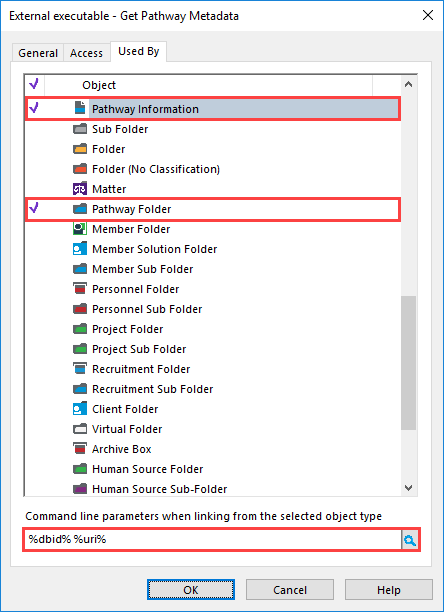
Click the OK button and navigate back into the Properties of the Get Pathway Metadata Add-In and select the Used By tab
-
Tag the appropriate record types and enter the parameters %dbid% %uri% for each one:
-
Click the OK button twice NOTE: To setup Get Pathway Metadata to be available for both 32-bit and 64-bit versions of Content Manager, simply repeat the steps above using the 32-bit executable and 64-bit executable and give the external links different names.
CM 10 AND ABOVE
-
Open Content Manager and click on Tools > Administration > External Links
-
Right Click, and select New External Link
-
From the external link type list, select External executable, click OK
-
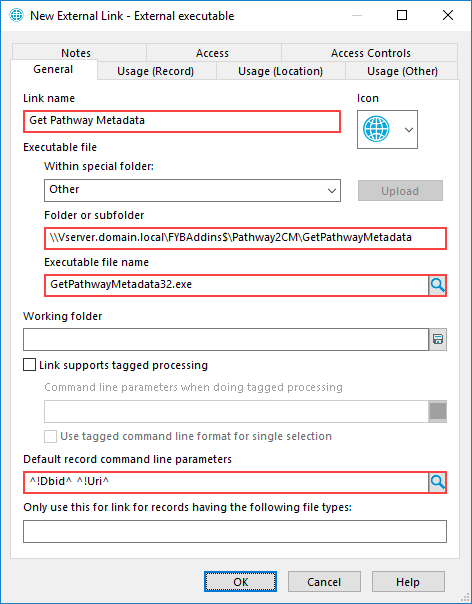
Enter the Link Name as Get Pathway Metadata
-
Under ‘Folder or Subfolder’, enter the Network Location of the FYB Addins\Pathway2CM\GetPathwayMetadata folder obtained in step 9 of INSTALLING FYB PATHWAY2CM GENCON DRIVER
NOTEPlease use the fully qualified domain name (FQDN) when adding the External Links to stop security prompts For Example: If the share has been set up as \server\FYB Addins$\Pathway2CM\GetPathwayMetadata
The FQDN is \server.domain.local\FYBAddIns$\Pathway2CM\GetPathwayMetadata
You can obtain the FQDN from the Server you are installing at Computer > Properties -
Under Executable File Name browse to the GetPathwayMetadata folder and select
(for 32-bit) OR
(for 64-bit) -
Under Default record command line parameters enter ^!Dbid^ ^!Uri^
-
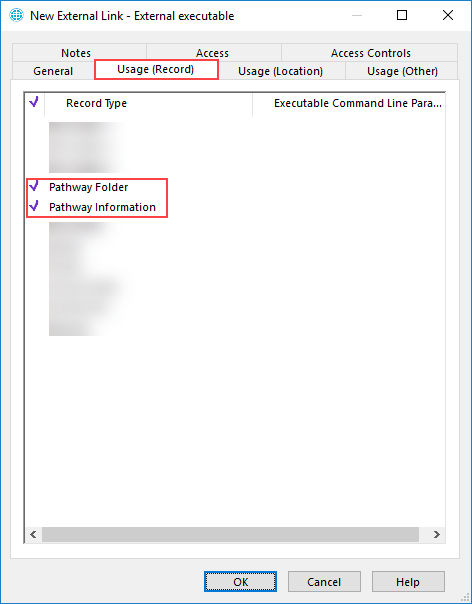
Select the Usage (Record) tab.
-
Tag the appropriate record types.
-
Click the OK button
SETTINGS
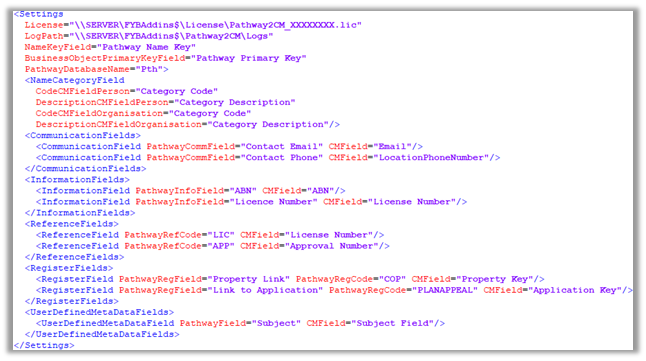
Within the \Pathway2CM\GetPathwayMetadata\ folder, open GetPathwayMetadata.config and update the settings to suit your environment.
| SETTING | VALUE |
|---|---|
| License | The shared path of the Pathway2CM license |
| LogPath | The shared path of the directory to store log files in |
| NameKeyField | The name of the Content Manager field that will store the Name Key (see Content Manager Fields). |
| BusinessObjectPrimaryKeyField | The name of the Content Manager field that will store the Business Object Primary Key (see Content Manager Fields). |
| PathwayDatabaseName | The name of the Pathway database to connect to |
| NameCategoryField | The Content Manager location fields that will store data from the Person Category and Company Category name fields in Pathway. CodeCMFieldPerson - The Content Manager field that will store the Category Code from the Person Category field. DescriptionCMFieldPerson - The Content Manager field that will store the Category Description from the Person Category field. CodeCMFieldOrganisation - The Content Manager field that will store the Category Code from the Company Category field. DescriptionCMFieldOrganisation - The Content Manager field that will store the Category Description from the Company Category field. |
| CommunicationFields | The Content Manager location fields that will store data from the Communication Details name fields in Pathway. PathwayCommField - The Pathway Communication Type. CMField - The Content Manager field that will store this Communication Type. To map to the location’s Email field enter Email. Multiple Pathway email fields can be mapped to Email. (see Content Manager Fields). |
| InformationFields | The Content Manager location fields that will store data from the Information Details name fields in Pathway. PathwayInfoField - The Pathway Information Type. CMField - The Content Manager field that will store this Information Type. |
| ReferenceFields | The Content Manager fields that will store data from the Reference fields in Pathway. PathwayRefCode - The Pathway Reference Type Code. CMField - The Content Manager field that will store this Reference Type. |
| RegisterFields | The Content Manager fields that will store data from the Register fields in Pathway. PathwayRegField - The Pathway Register Field Name. PathwayRegCode – The Pathway Register Code. CMField - The Content Manager field that will store this Register field value. |
| UserDefinedMetaDataFields | The Content Manager fields that will store data from the User Defined Meta-Data fields in Pathway. PathwayField - The Pathway User Defined Meta-Data Field Name. CMField - The Content Manager field that will store this field value. |
CONTENT MANAGER FIELDS
When mapping Pathway fields to Content Manager fields, in some cases you may choose to map to either an additional field or a stock property. If you are mapping to an additional field, you can simply enter the name or search clause name of the additional field. If you are mapping to a stock property, you need to use the names listed below. Please note, the mapping names are case sensitive.
| OBJECT TYPE | PROPERTY | MAPPING NAME |
|---|---|---|
| Record | External ID | RecordExternalReference |
| Record | Notes | RecordNotes |
| Location | ID Number | LocationIdNumber |
| Location | Home Phone | LocationAfterHoursPhoneNumber |
| Location | Business Phone | LocationPhoneNumber |
| Location | Fax | LocationFaxNumber |
| Location | Mobile Phone | MobileNumber |
| Location | Web Page | LocationWebPage |