
Sales2CM Installation Guide
DISCLAIMER
Any advice FYB provides in relation to setting up any FYB App, FYB Add-in, FYB Connector and or advice in relation to opening access to your on-premises or in the cloud systems will be general advice only. This means that the advice is of a general nature and will not consider your network setup, network infrastructure or any security requirements that you may have or in fact need. It is highly advised that you seek advice from internal or external providers to ensure that they are comfortable with what is required prior to going ahead with any deployment, setup, or configuration for external access.
LICENSE DETAILS
Please contact FYB for a valid license if you are yet to obtain one for your connector.
INSTALLATION COMPONENTS
The following installation components are required to ensure the full functionality of Sales2CM:
- FYB Sales2CM Web Application - This is a server-side installation
- FYB CMLauncher - This is a client-side installation
SALESFORCE CONFIGURATION
If upgrading from an older version of Sales2CM and the Salesforce app is already created and configured you must still double check the below settings as some may have changed.
-
Log in to Salesforce with an administrator account
-
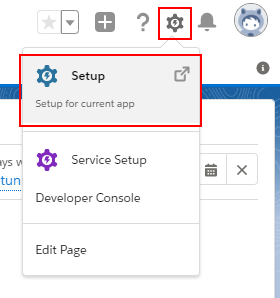
Click the cog icon and select the Setup option
-
Under Apps, select App Manager

-
Click New Connected App
-
Enter the following details under Basic Information. Use your organisation's email and contact phone number. Connected App Name: FYB Sales2CM API Name(Automatic): FYB_Sales2CM Contact Email: example@example.com.au Contact Phone: XXXX XXX XXX
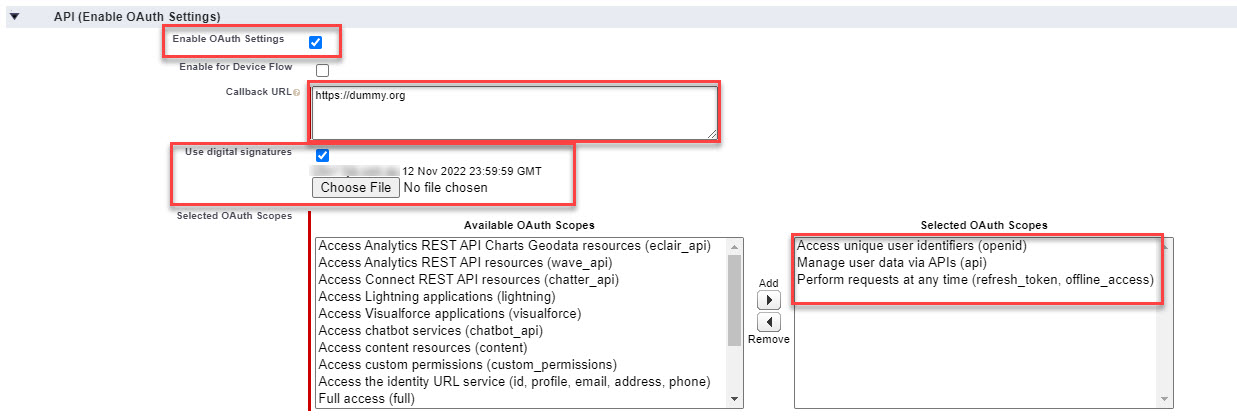
 6. Under API (Enable OAuth Settings) check Enable OAuth Settings
 7. Enter the Callback URL: https://dummy.org (this will not be used)
8. Enable the Use digital signatures option
 9. Click Choose File and upload the .cer file that contains the public key of your Sales2CM certificate (obtained from the CERTIFICATE BASED AUTHENTICATION section of this guide)
10. Under Selected OAuth scopes select the following:
- Manage user data via APIs (api)
- Access unique user identifiers (openid)
- Perform requests at any time (refresh_token, offline_access)
-
Click on the Save button
Note!As advised by Salesforce, it can take several minutes (2 to 10) for changes to the App settings to take effect.
-
Under Apps, select App Manager. Click the drop-down arrow for FYB Sales2CM and select Manage

-
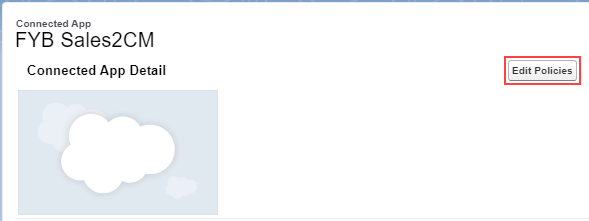
Click on the Edit Policies button
-
Under OAuth Policies set Permitted Users to Admin approved users are pre-authorized, IP Relaxation to Relax IP restrictions, and Refresh Token Policy to Expire refresh token after 1 Day(s)

-
Click on the Save button

-
Under Apps, select App Manager, click the drop-down arrow for FYB Sales2CM, and select View

-
Under API (Enable OAuth Settings), take a copy of the Consumer Key

-
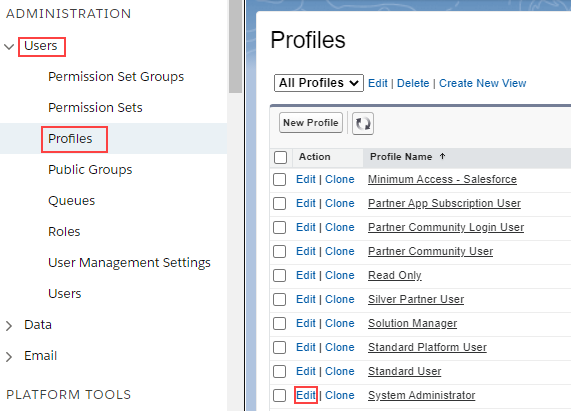
Under ADMINISTRATION, click Users, then click Profiles, then next to System Administrator click Edit
-
Under Connected App Access check FYB Sales2CM

-
Click on the Save button

INSTALLING SALES2CM WEB APPLICATION
LICENSE
-
Create a folder to house the license file (.lic) on the IIS Server
-
Place the license file in this folder
NoteYou will be asked to enter this location during the installation
TRUSTED USER ACCOUNT
-
Add the account that will run the application pool as a Trusted User Account in Enterprise Studio. Please refer to your Enterprise Studio help file on adding trusted accounts. If using a system account (application pool identity, network service, etc) you will be required to enter the details as DOMAIN\ServerName$. If using a dedicated windows service account, you will be required to enter the details as DOMAIN\username.
NoteThe account running the app pool will need to have a valid Content Manager login.
UPGRADING FROM SALES2CM v1 to v3
When upgrading from Sales2CM v1.x to v2.x or v3.x prior to installing the new MSI, the following must be completed.
-
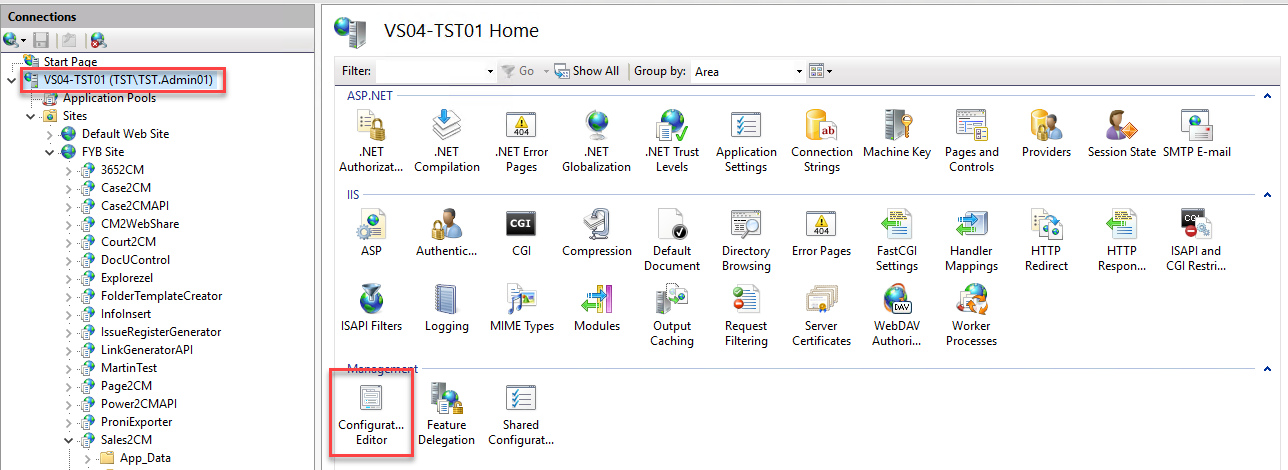
Navigate to IIS > Click on the Server Name > Click Configuration Editor
-
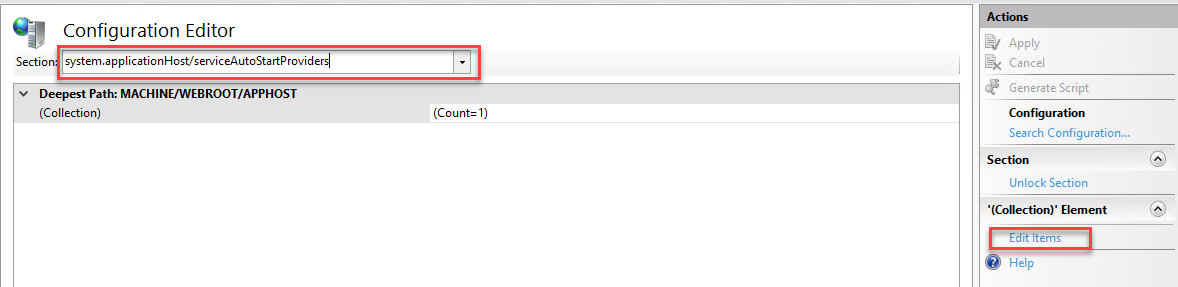
Within the section dropdown enter "system.applicationHost/serviceAutoStartProviders" and Click on Edit Items
-
Highlight the Sales2CMAutoStartProvider - Sales2CM.PreloadClient and click on the Remove button

INSTALLATION
The FYB Sales2CM MSI will:
- Deploy the installation files
- Setup the application pool and application in IIS
- Setup the temp folder
- Configure the application settings as specified by the user
Before running the MSI ensure that all prerequisites are complete. Including deploying the .NET 8 SDK and Hosting Bundle.
To deploy the Net Core SDK and Hosting Bundle to the server, follow these steps:
-
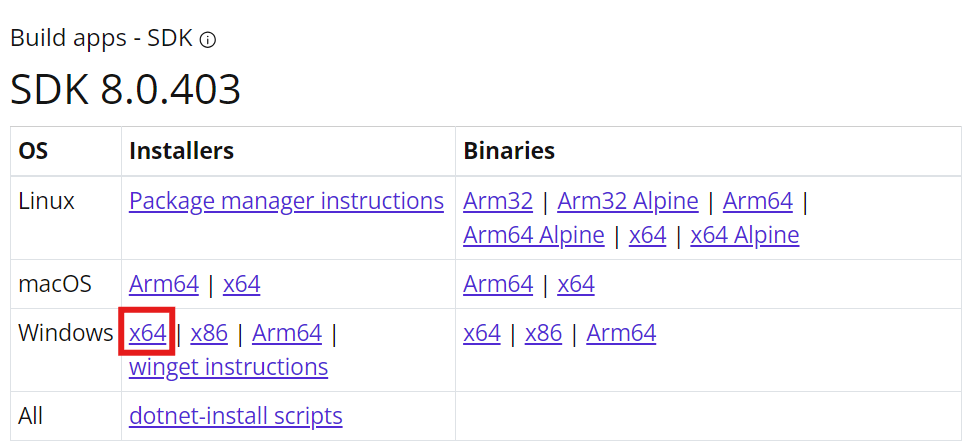
Install the latest .NET 8 SDK (x64) found here
-
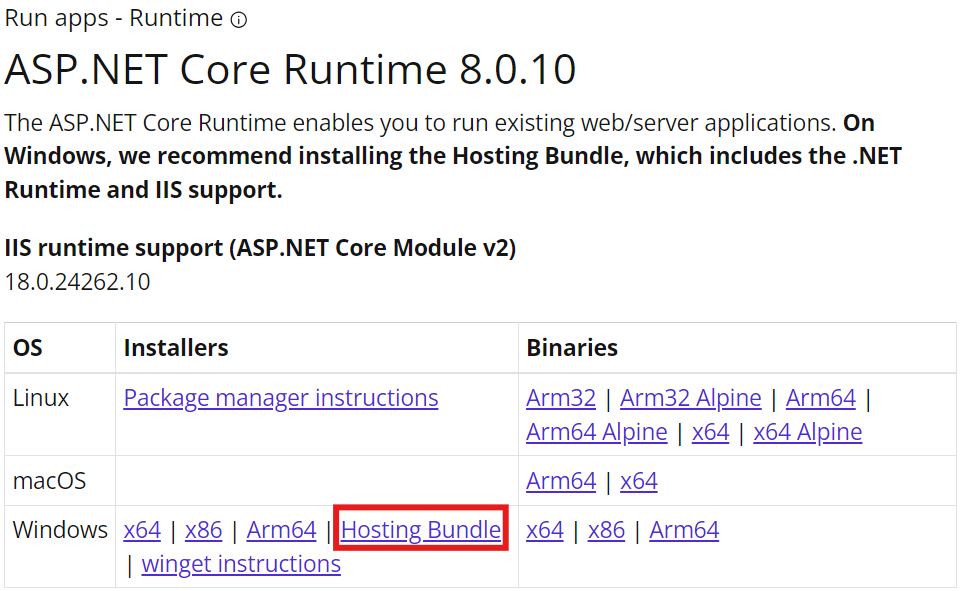
Install the latest ASP.NET Core 8 Runtime Hosting Bundle found here
-
Once both executables have been installed, complete a full server restart to allow for .NET 8 to bind to IIS. If a server restart is not possible an IIS reset can be completed with the following CMDs from an elevated command prompt.
- net stop was /y
- net start w3svc
- iisreset
NoteTo check that the SDK has been attached to the hosting bundle, open Command Prompt and type dotnet --info
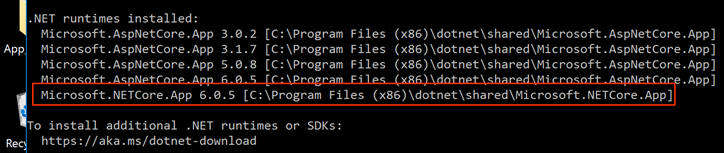
To install Sales2CM, follow these steps:
-
Run command prompt as an administrator and launch the Sales2CM-XXX.msi
-
Click on the Next button
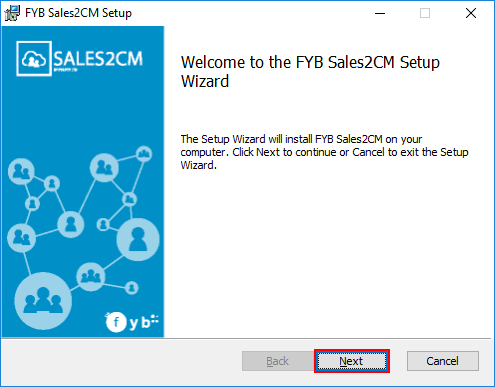
-
On the Web Application Settings screen, select a Site to host the application and click on the Next button
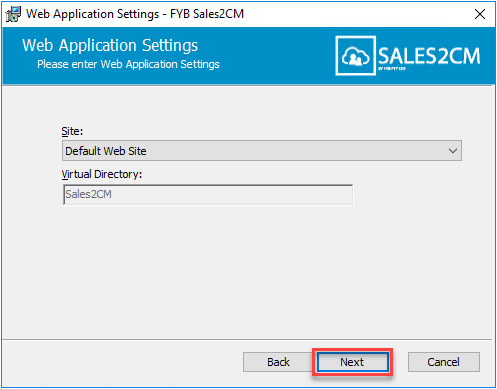 Note
The site the connector is being installed underneath must be https protected and able to communicate with the Salesforce API outside your network.

-
On the Application Pool Settings screen, enter the domain, username, and password for the Application Pool identity. Click Next
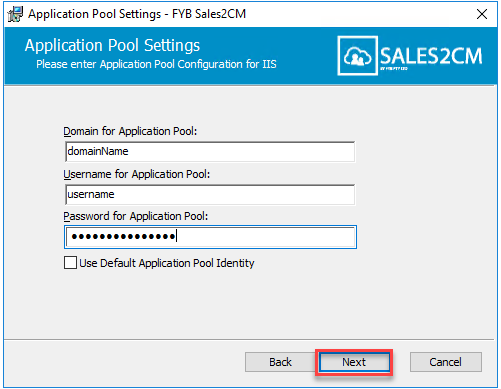 Note
The account used to run the App Pool must have access to the digital certificate that was uploaded to Salesforce in step 9 of the Salesforce Configuration section.
-
On the General Configuration Settings screen enter the required settings and click on the Next button
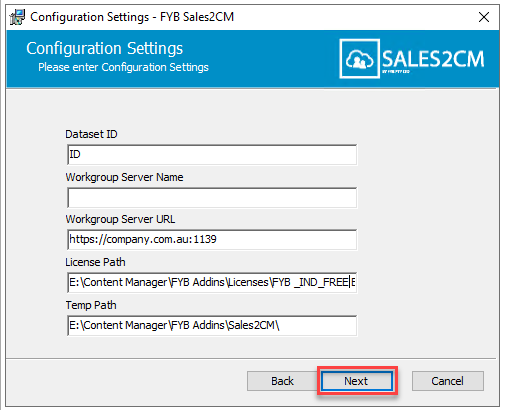
NAME DESCRIPTION Dataset ID The two alphanumeric character dataset identifier. Workgroup Server Content Manager workgroup server name. This is generally set to local Workgroup Server URL Content Manager workgroup server URL. License Path The path to your license including the .lic file Temp Path The folder Sales2CM will use to store temporary files -
If your environment is configured to only allow OpenId authentication (e.g. Azure AD or ADFS) for your Content Manager, you'll receive the following message:
 Note
If you have not already, please ensure you are using a Workgroup Server URL not the Workgroup Server Name for the connection defined on the previous screen
-
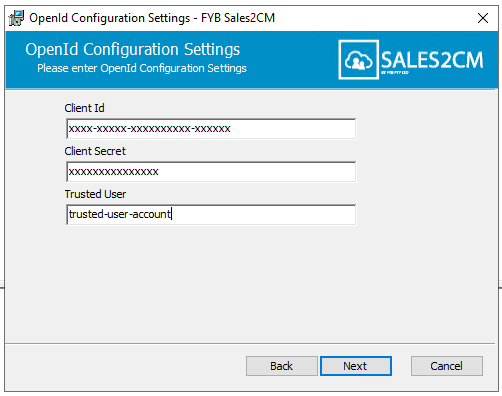
Click OK to navigate to the Open Id settings screen and enter the required values
 Note
NAME DESCRIPTION Client Id The Client/App Id of the Open Id application used to secure Content Manager. For ADFS authentication, this will be the username of the Confidential Client app. Client Secret The Client/App Secret of the Open Id application used to secure Content Manager. For ADFS authentication, this will be the password of the Confidential Client app. Trusted User The Network Login value of the Content Manager Confidential Client app location. For ADFS authentication, this will be the username of the Confidential Client app. -
On the Email Settings screen enter the required settings and click on the Next button
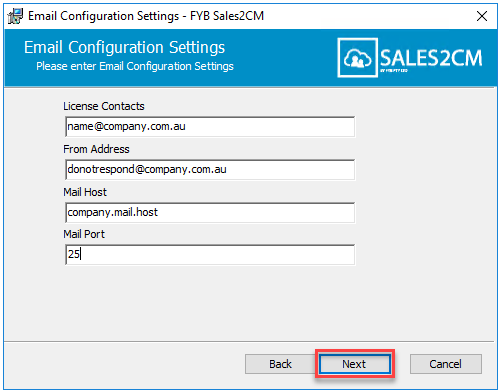
NAME DESCRIPTION License Contacts The email addresses that will be contacted for any license expiry notifications. Multiple contacts can be added by adding a ';' between each contact From Address The email address that all email notifications will be sent from Mail Host The mail host for all email notifications to be sent Mail Port The mail port used for all email notifications to be sent -
On the Salesforce Settings screen enter the required settings and click on the Next button
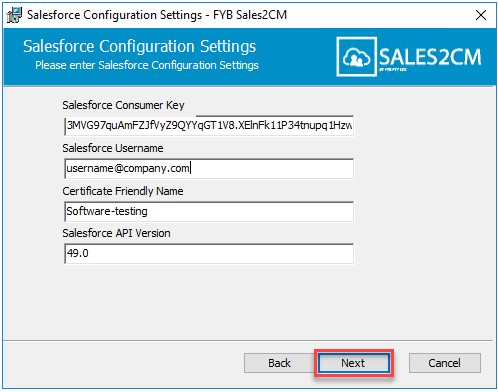
NAME DESCRIPTION Consumer Key The Consumer Key of the Salesforce connected app. This is obtained in the SALESFORCE CONFIGURATION section of this guide. Salesforce Username The username of the account that Sales2CM will use to connect to Salesforce. Certificate Friendly Name The certificate friendly name of the certificate used in step 9 of SALESFORCE CONFIGURATION Salesforce API Version The version of your Salesforce API. This matches the version of the Salesforce instance. Version must be in format XX.X (e.g. 49.0) -
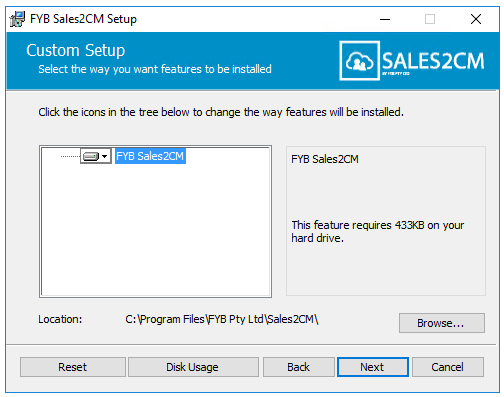
On the Custom Setup screen select the install location and click on the Next button
-
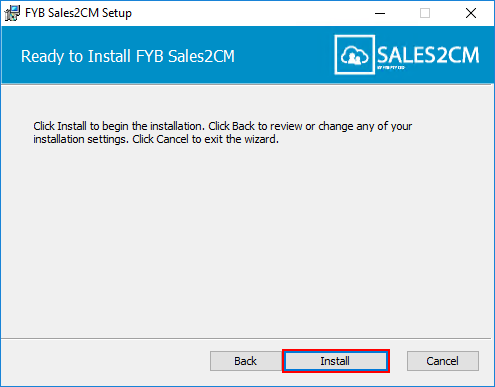
On the Confirm Installation window, click on the Install button
COMMAND LINE ARGUMENTS (OPTIONAL)
The follow command line arguments can be passed to the MSI if required.
| ARGUMENT | PURPOSE |
|---|---|
| DBID | Sets the Database ID that connects to Content Manager dataset to run the application |
| Workgroup Server | Content Manager workgroup server name. This should generally be set to local |
| Workgroup Server URL | Content Manager workgroup server URL. |
| LICENSE_PATH | Sets the license that connects to the application |
| TEMP_PATH | Sets the temporary path that connects to the application |
| LIC_CONTACTS | Sets the license contacts for the email notifications |
| FROM_ADDRESS | Sets the from address for the email notifications |
| MAIL_HOST | Sets the mail host for the email notifications |
| MAIL_PORT | Sets the mail port for the email notifications |
| CERTIFICATE_NAME | The certificate friendly name of the certificate used in step 9 of SALESFORCE CONFIGURATION |
| CONSUMER_KEY | The Consumer Key of the Salesforce connected app. This is obtained in the SALESFORCE CONFIGURATION section of this guide. |
| SALESFORCE_USERNAME | The username of the account that Sales2CM will use to connect to Salesforce. |
| API_VERSION | The version of Salesforce instance. This is used to connect to the API |
| WEB_APP_POOL_IDENTITY_DOMAIN | Sets the App Pool domain for the application pool |
| WEB_APP_POOL_IDENTITY_NAME | Sets the App Pool username for the account running the application pool. Use "" around the username if there are any special characters |
| WEB_APP_POOL_IDENTITY_PWD | Sets the App Pool password for the account running the application pool. Use "" around the username if there are any special characters |
| CLIENT_ID | The Client ID for the Open ID authentication |
| CLIENT_SECRET | The Client secret for the Open ID authentication |
| TRUSTED_USER | The trusted user account for the Open ID authentication |
CONFIGURATION
IIS CONFIGURATION
-
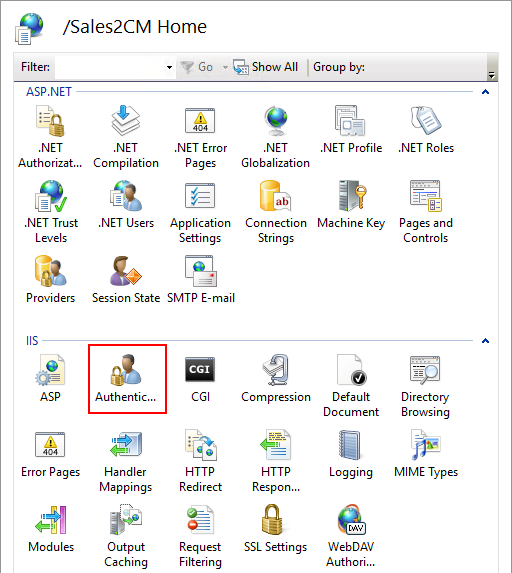
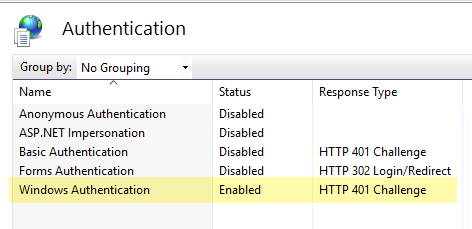
From the Features View go to Authentication and check that Windows Authentication is enabled. All other methods should be disabled.
-
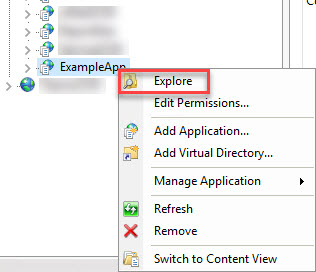
Right click the application in IIS and select explore
-
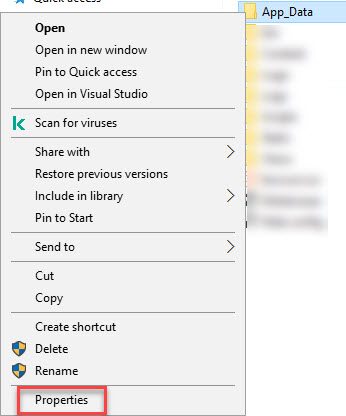
Right click the app data folder and select properties
-
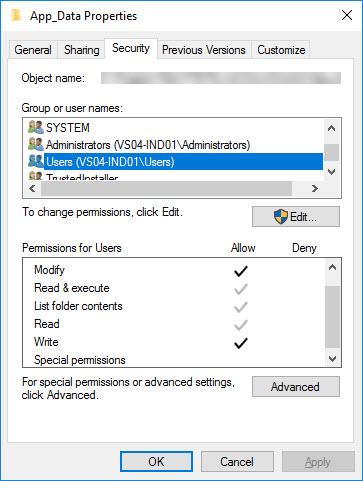
Navigate to the security tab and ensure users have read, write and modify permissions.
-
Click on Application Pools

-
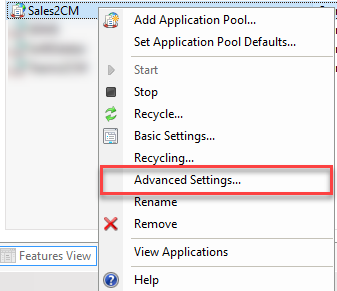
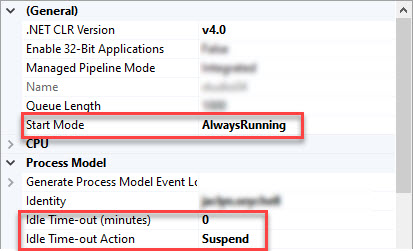
Within the application pool listing screen, right click on Sales2CM application pool and select the Advanced Settings option from the drop-down menu (you might have a different application name)
-
Within the Advanced Settings window, set Idle Time-out Action to Suspend, Idle Time-out Action (minutes) to 0 and Start Mode to Always Running click the OK button
-
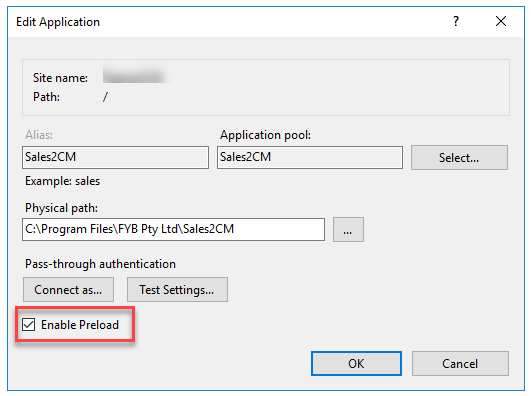
Select the Sales2CM app in IIS and click on Basic Settings, and set Enable Preload to true
-
Complete a restart of the app pool for the settings to take effect
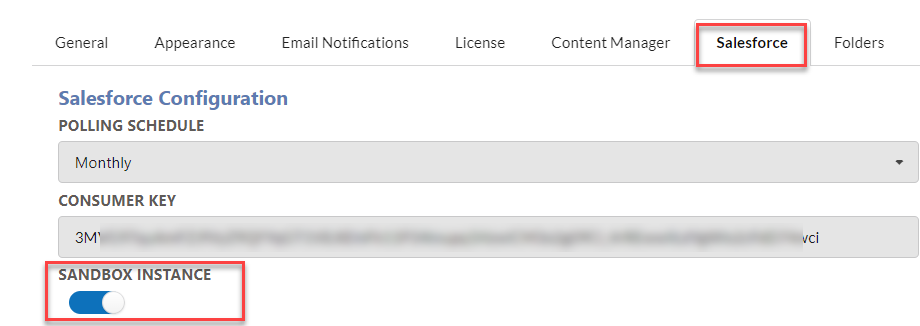
NoteIf you're connecting to a SANDBOX instance of Salesforce the Salesforce Sandbox option must be set to true
CONTENT MANAGER CONFIGURATION
The following additional fields need to be set up in Content Manager:
| FIELD NAME | TYPE | APPLIES TO OBJECTS | APPLIES TO |
|---|---|---|---|
| Account Id | string | Record, Organization | Record Type used for Salesforce Account folders |
| Contact Id | string | Person | Person and Organisation location types |
| Document Id | string | String | Record Type used for Salesforce documents |
| Document Version Id | string | String | Record Type used for Salesforce documents |
| Folder Type | string | Record | All record types being utilized by Sales2CM |
| Case Id | string | Record | All record types being utilized by Sales2CM |
| Template Id | string | Record | All record types being utilized by Sales2CM |
| Email Id | string | Record | Record Type used for Salesforce documents |
CUSTOM OBJECTS FOR SALES2CM (OPTIONAL)
Note that the below steps are optional and only required if you intend to capture custom objects from Salesforce
In order to capture a Custom Object from Salesforce into Content Manager the Custom Object must contain a Master-Detail relationship with the Salesforce Account Object. To create a Master-Detail relationship for a Custom Object, complete the following:
-
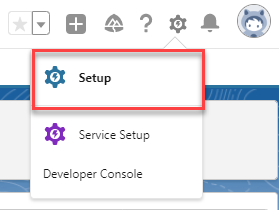
Click on the Cog icon, Click Setup
-
Click Object Manager and click on the Custom Object being used. Otherwise create the new Custom Object required

-
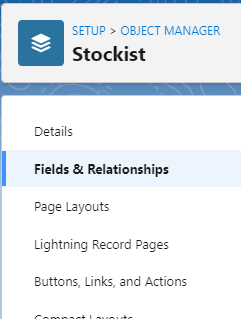
Click on Fields & Relationships
-
Click New

-
Click Lookup within the Data Type, followed by clicking Next

-
Select Account from the Related To dropdown and click Next

-
Click Next through the rest of the pages, and do not change any displayed default data.
-
Click Save.
-
If the Custom Object already exists, you must populate the Account on each object. If this is not completed, the Custom Field cannot be updated to a Master-Detail relationship which is required by Sales2CM.

-
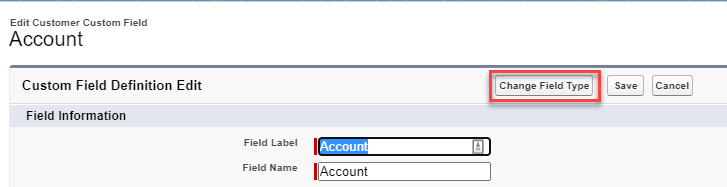
Redirect back to the Object Manager > Fields and Relationships. Click Edit on the Account Lookup.

-
Click on Change Field Type
-
Select the Master-Detail Relationship . Click Next. Click Save
 API Names
Please ensure that the API name of the account is Account__c. Do not change the API name at any point. This exact name is required by Sales2CM.
CERTIFICATE BASED AUTHENTICATION
The application utilizes a certificate-based authentication to verify its identity to Salesforce, as such you will need to register a certificate for your application in the registration portal.
You can choose to use an existing certificate if you have one otherwise you can create/purchase a new certificate for this purpose. Please follow the steps below on how to upload a certificate:
-
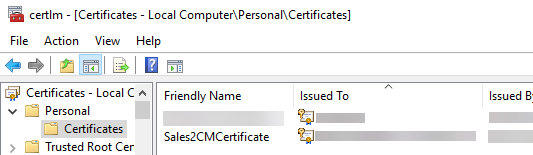
After obtaining a copy of your certificate (.pfx), install the certificate-to-certificate manager under local machine on the server the application will be installed on
-
Ensure the certificate has been given a friendly name, this is required when installing the app to the server
-
Please ensure the account that will be running the application pool for the application has access to the certificate private key
-
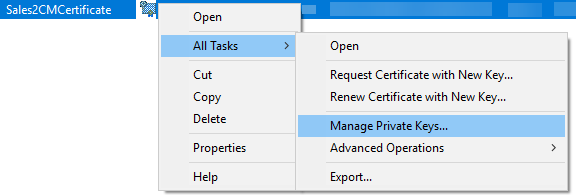
Right-click the certificate, select All Tasks > Manage Private Keys
-
Grant the account running the app pool full control permission on the certificate
-
Export the public key from the certificate using the (https://docs.microsoft.com/en-us/azure/application-gateway/certificates-for-backend-authentication), you will only need to complete step 1 to 7 in the Export authentication certificate (for v1 SKU) section. NOTE: Sales2CM does not use Azure, but the steps for exporting the certificate are the same.
ADDING THE RECORD VIEW TO SALESFORCE (LIGHTNING)
The following instructions describe how to add a Record View page to the Account object to view records related to that account. Similar steps can be taken to add a Record View page for other objects.
-
Log in to Salesforce as your Admin account
-
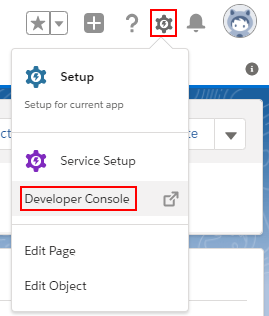
Click on the Cog button, then click on Developer Console
-
Click File -> New -> Apex Class

-
Enter the name AccountController

-
Copy the following code into the new class: Note:
\<servername\>should be replaced with the name of the server that Sales2CM is installed on. This code assumes that each folder in Content Manager that is related to a Salesforce account will have an additional field called accountId which stores the account id. The query here can be adjusted if necessary.
public class AccountController
{
    private final Account acct;

    public AccountController(ApexPages.StandardController stdController)
    {
        this.acct = (Account)stdController.getRecord();
    }

    public string getAddress()
   {
        return 'https://\<servername\>/Sales2CM/Grid?query=containerEx:[accountId:' +            acct.Id + ']&pageSize=10';
   }

   public string getAccountNumber()
   {
        string accId = acct.Id;
        string accountNumber;

        List\<account\> result = [SELECT AccountNumber FROM Account WHERE Id = :accId         LIMIT 1];

        if(result.size() == 1)
        {
            accountNumber = result[0].AccountNumber;
        }

        return accountNumber;
    }
}
-
Click on File and select the Save option
-
Click File -> New Visualforce Page
-
Enter the name of AccountPage into the displayed window and click on the OK button

-
Copy the following code into the new page:
<apex:page StandardController="Account" Extensions="AccountController" showHeader="false">
    <div style="height:590px">
        <apex:iframe id="theIframe" src="{!Address}" scrolling="true" height="100%"/>
    </div>
</apex:page>
-
Click on File and select the Save option
-
In Salesforce, click the cog icon and click Setup
-
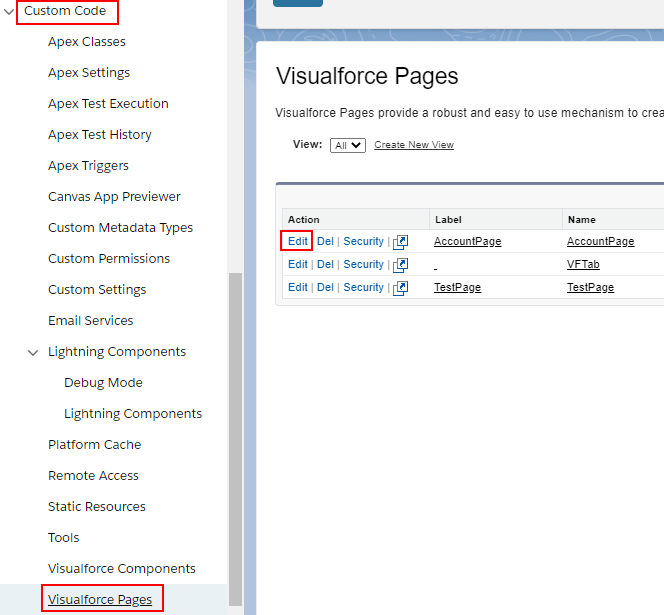
Click Custom Code
-
Click Visualforce Pages and click Edit next to AccountPage
-
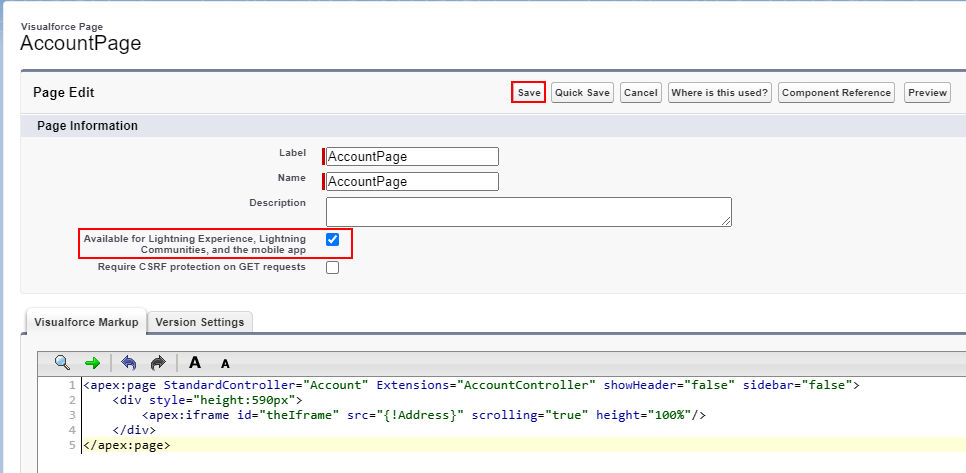
Check the Available for Lightning Experience, Lightning Communities, and the mobile app checkbox
 PLEASE NOTE
If you make any changes to the page, then this checkbox will revert to being unchecked, and you will need to check it again before the page will be available for use.
-
Click on the Save button
-
In Salesforce, navigate to any account page
-
Click the cog button, followed by clicking the Edit Page button

-
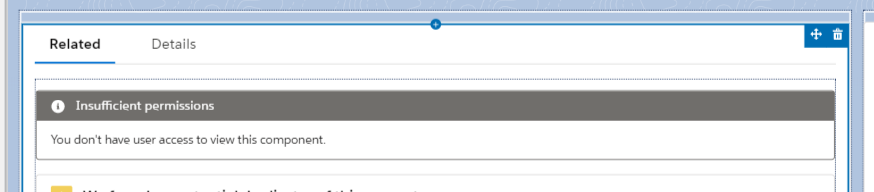
Select the tab control in the middle of the page
-
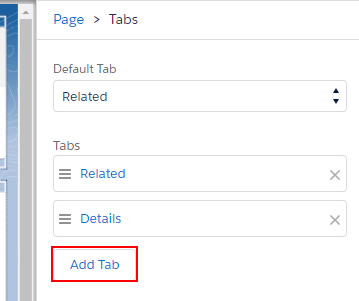
On the right of the screen, click Add Tab
-
A new tab called Details will be created
-
Click on the new Details tab, and change the Tab Label to Custom.

-
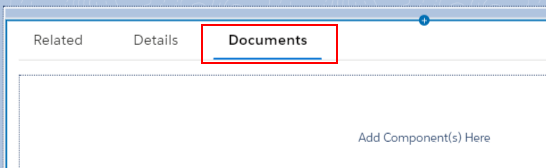
Enter the custom label Documents

-
Click on theDone button
-
Select the Documents tab
-
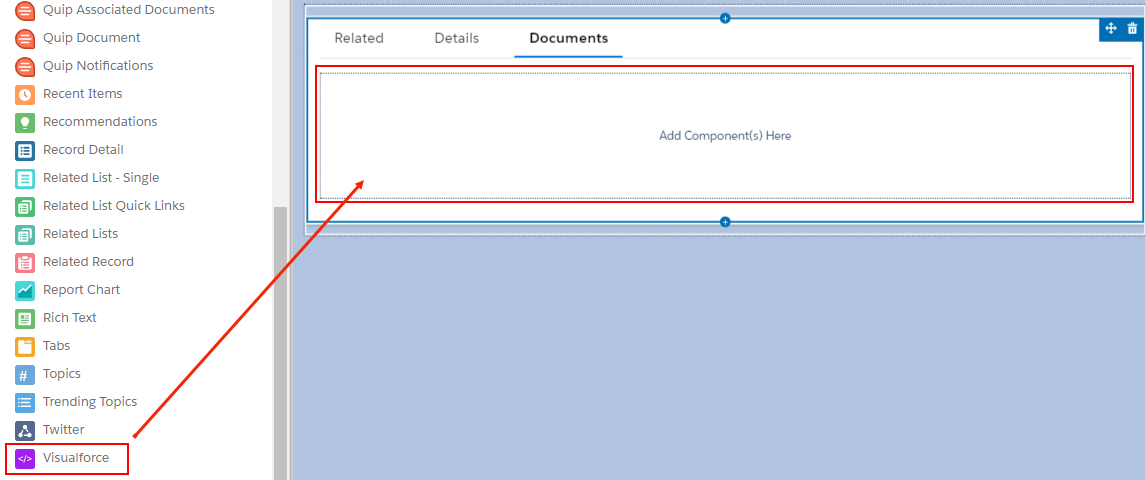
From the menu on the left, click and drag Visualforce to where it says Add Component(s) Here
-
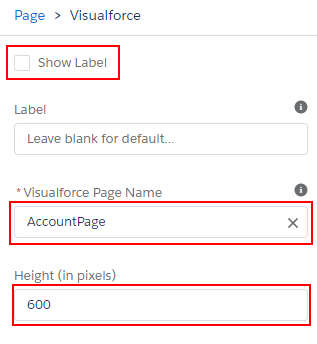
On the right, uncheck Show Label. Under Visualforce Page Name enter AccountPage. Under Height (in pixels) enter 600
-
Click on the Save button

ADDING THE RECORD VIEW TO SALESFORCE (CLASSIC)
The following instructions describe how to add a Record View page to the Account object to view records related to that account. Similar steps can be taken to add a Record View page for other objects.
-
Log in to Salesforce as your Admin account
-
Click on your profile, then click on Developer Console

-
Click on File -> New -> Apex Class
-
Enter the name AccountController
-
Copy the following code into the new class: Note:
\<servername\>should be replaced with the name of the server that Sales2CM is installed on. This code assumes that each folder in Content Manager that is related to a Salesforce account will have an additional field called accountId which stores the account id. The query here can be adjusted if necessary.
public class AccountController
{
    private final Account acct;

    public AccountController(ApexPages.StandardController stdController)
    {
        this.acct = (Account)stdController.getRecord();
    }

    public string getAddress()
   {
        return 'https://\<servername\>/Sales2CM/Grid?query=containerEx[accountId:' +            acct.Id + ']&pageSize=10';
   }

   public string getAccountNumber()
   {
        string accId = acct.Id;
        string accountNumber;

        List\<account\> result = [SELECT AccountNumber FROM Account WHERE Id = :accId         LIMIT 1];

        if(result.size() == 1)
        {
            accountNumber = result[0].AccountNumber;
        }

        return accountNumber;
    }
}
-
Click on File and select the Save option
-
Click on File and select New Visualforce Page option
-
Enter the name AccountPage and click on the OK button
-
Copy the following code into the new page:
<apex:page StandardController="Account" Extensions="AccountController" showHeader="false">
    <div style="height:590px">
        <apex:iframe id="theIframe" src="{!Address}" scrolling="true" height="100%"/>
    </div>
</apex:page>
-
Click on File and select the Save option
-
In Salesforce, click on the Setup button

-
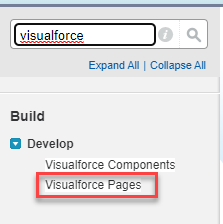
Search in the left hand menu VisualForce
-
Click Visualforce Pages and click Edit next to AccountPage

-
Check the Available for Lightning Experience, Lightning Communities, and the mobile app checkbox
PLEASE NOTEIf you make any changes to the page, then this checkbox will revert to being unchecked, and you will need to check it again before the page will be available for use.
-
Click on the Save buttpm
-
In Salesforce, navigate to any Account page
-
Click the cog button, followed by clicking Edit Layout

-
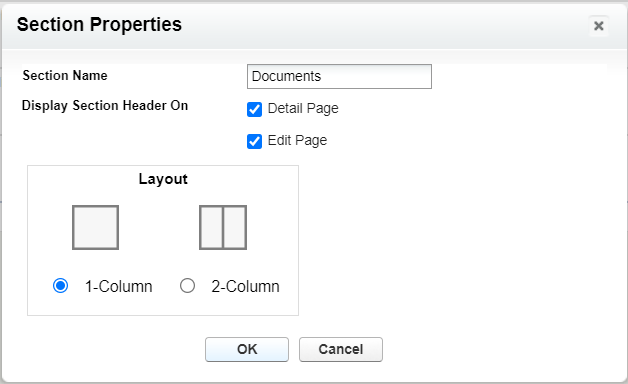
Select the Fields control and add a new Section by dragging and dropping the new section into the layout.

-
Name the Section Documents and select Layout as 1-Column
-
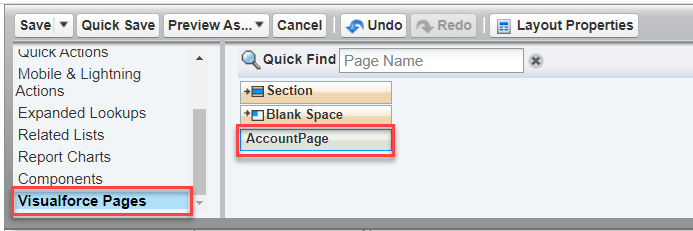
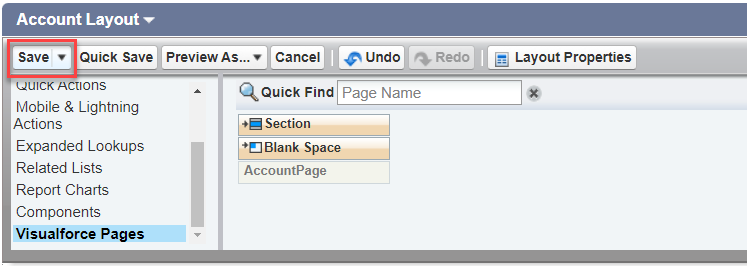
Scroll down in the Layout Properties and click Visualforce Pages. Drag and drop the AccountPage into the Documents section
-
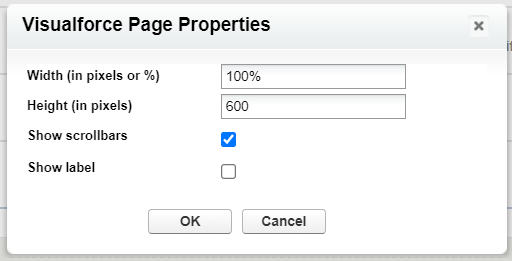
Click Properties on the AccountPage

-
Uncheck Show Label. Check Show Scrollbars . Under Height (in pixels) enter 600
-
Click on the Ok button
-
Click on the Save button
INSTALLING CM LAUNCHER (OPTIONAL)
The FYB CMLauncher can be installed if required. It allows users to open documents directly from the record view in Salesforce. CMLauncher needs to be deployed to the users PC.
Please refer to the CMLauncher Installation Guide for further details.